

Something Old, New, Borrowed & Blue
Think about what you have on a shelf that needs some attention and be the creative floral artist you have always been. Imagine what an item can become and make it happen. Yes, you should always think out of the box when designing, creating and living.

Create something beautiful…
Think about what you have on a shelf that needs some attention and be the creative floral artist you have always been. Imagine what an item can become and make it happen. Yes, you should always think out of the box when designing, creating and living.
Something borrowed…
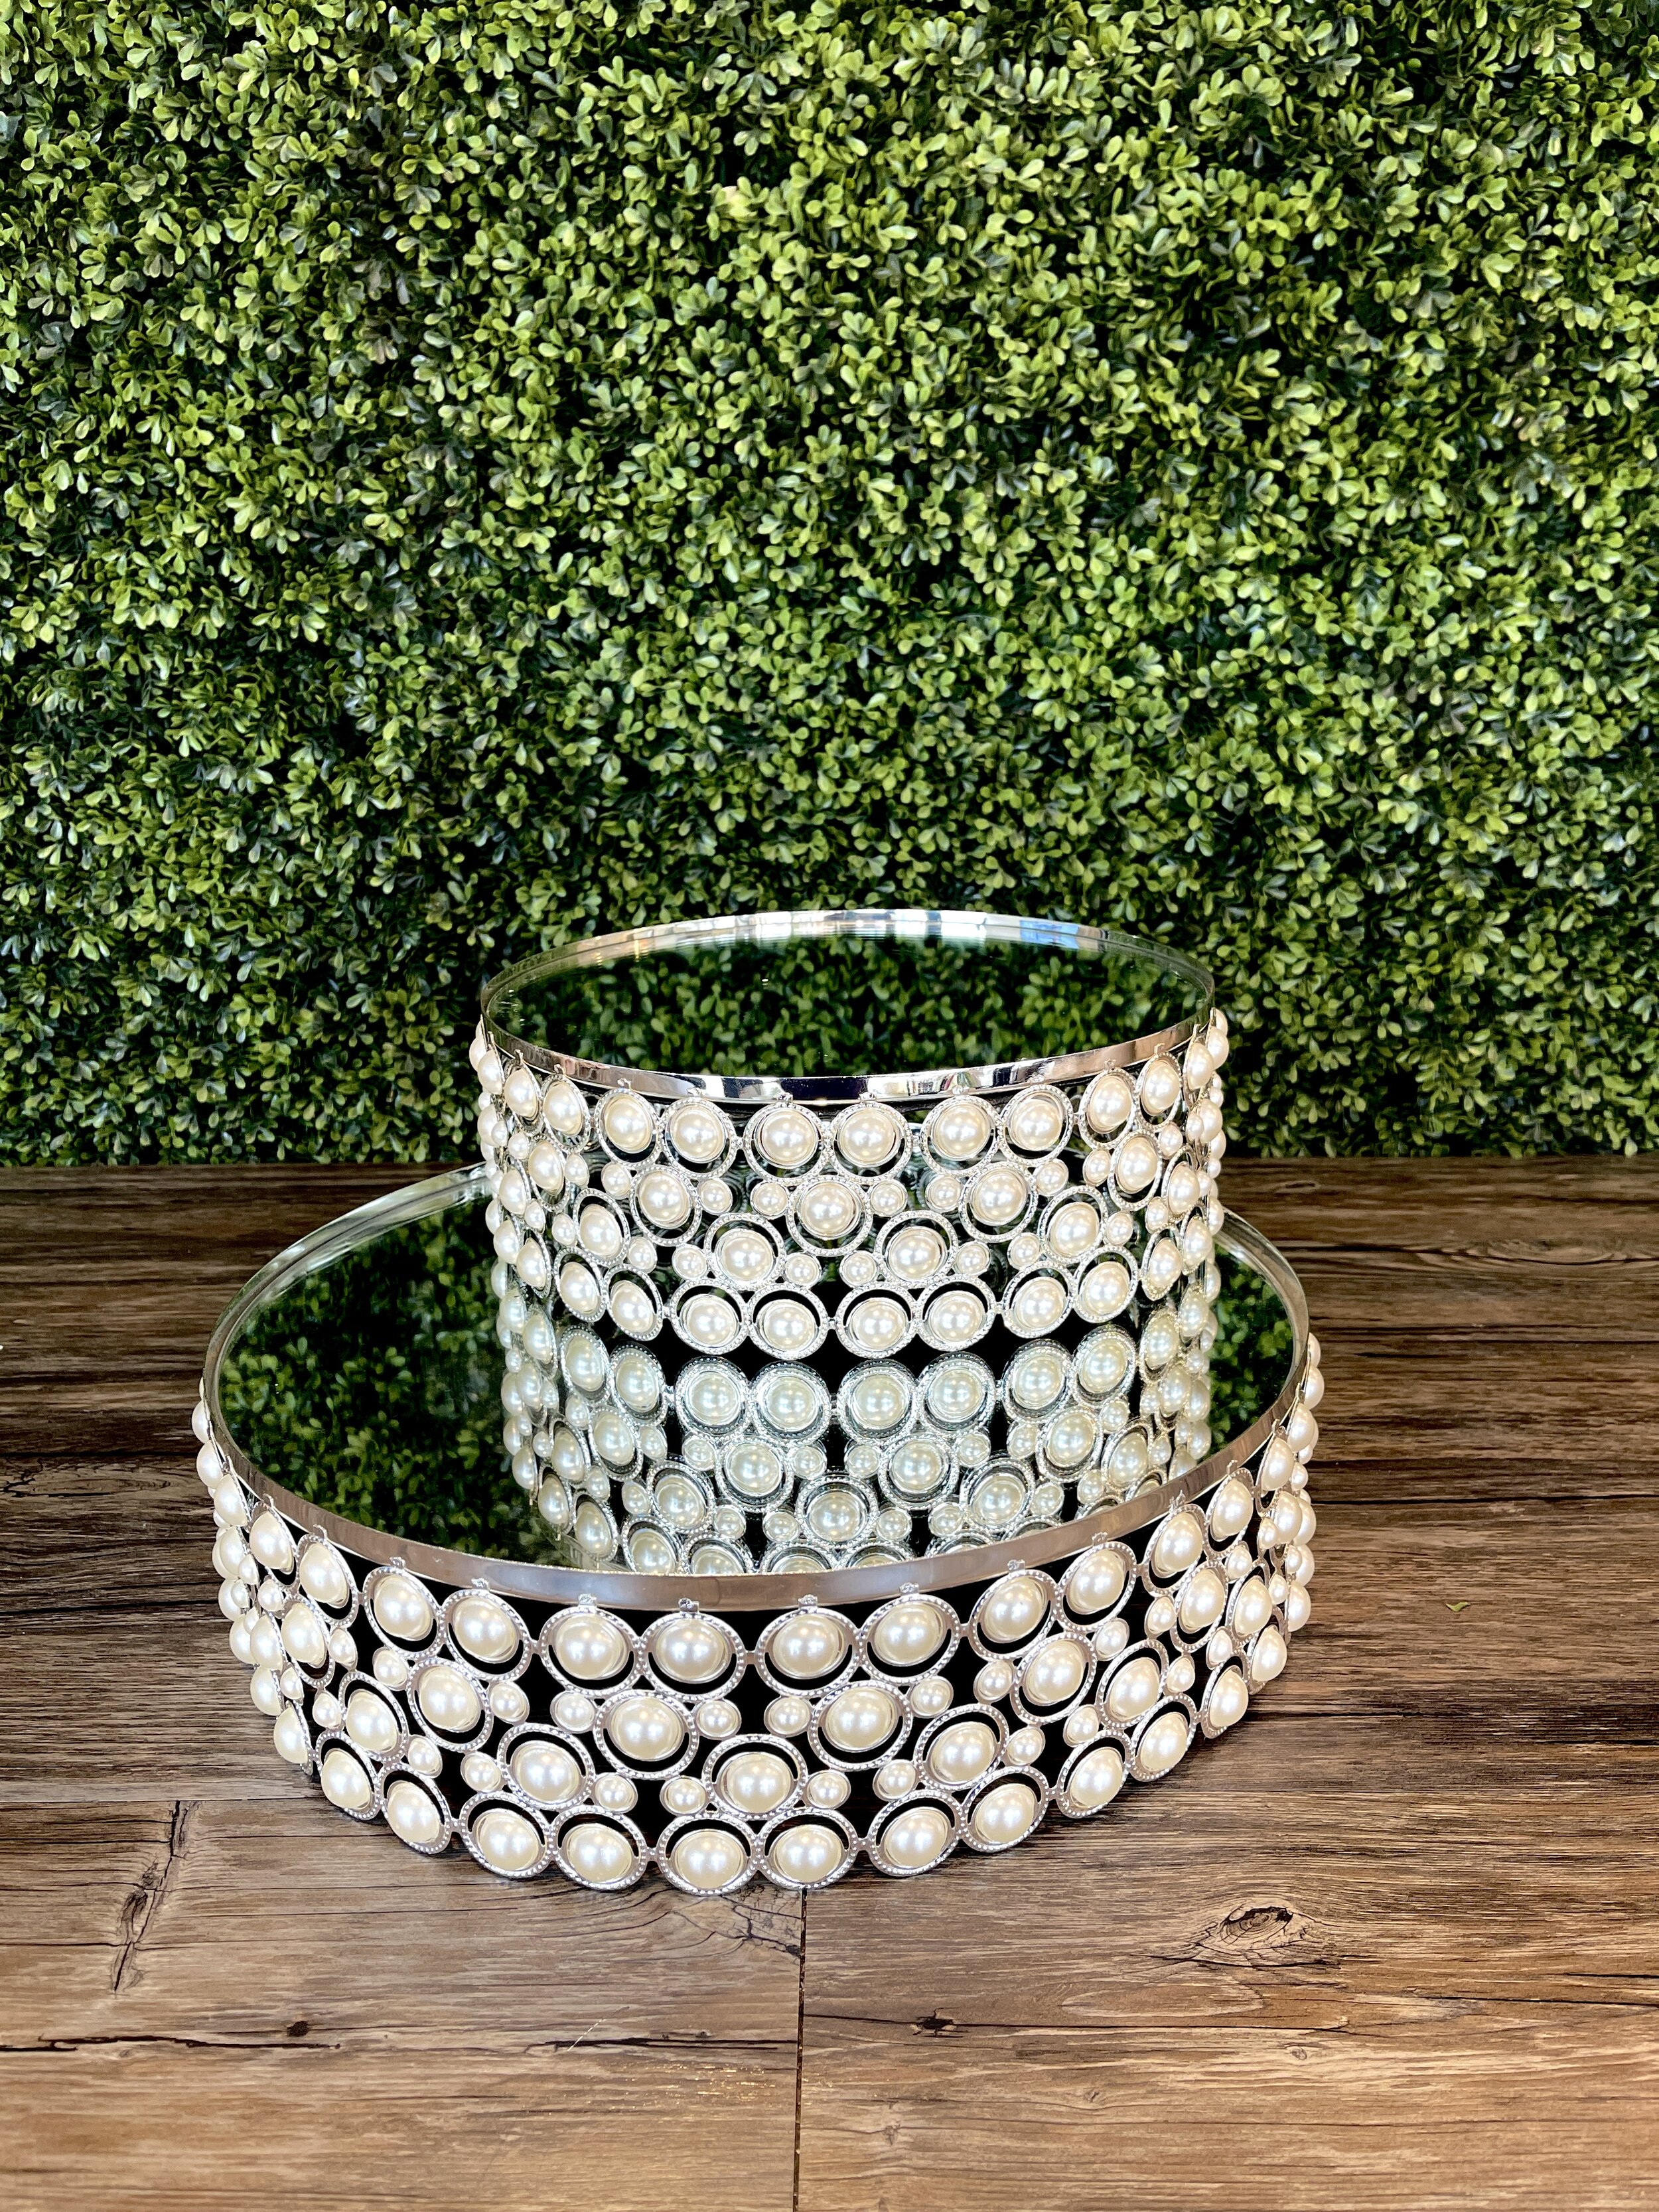
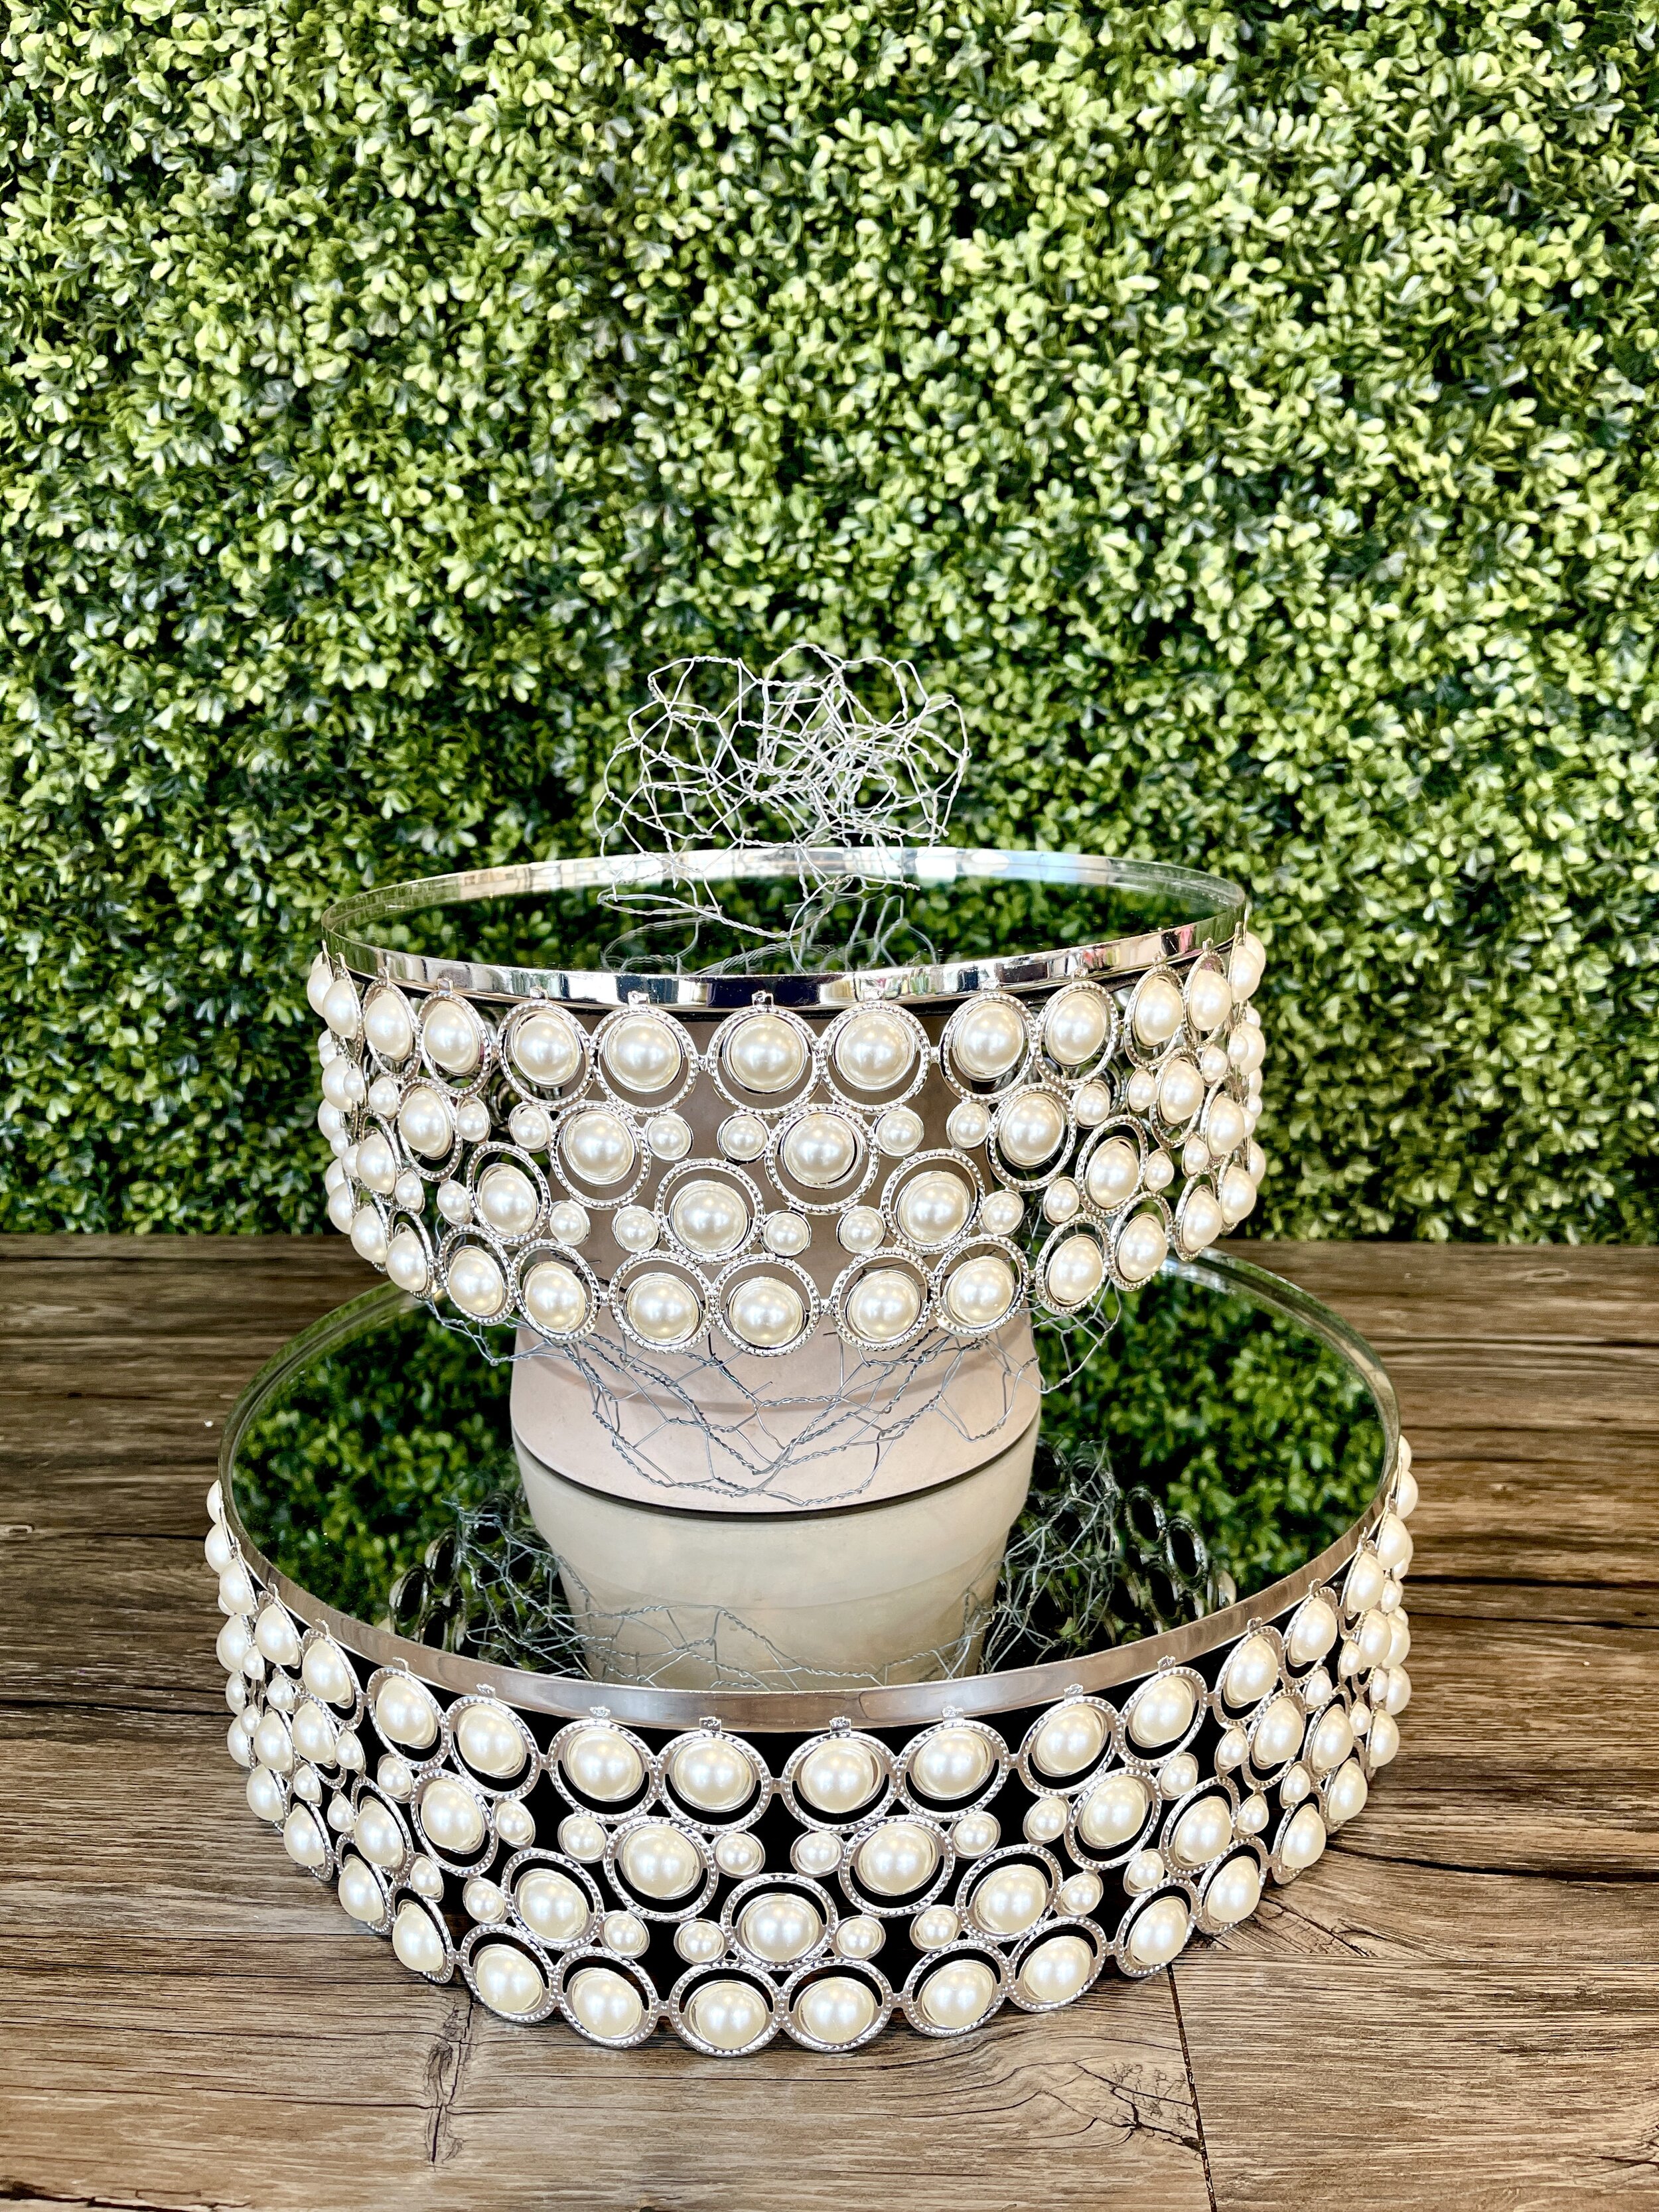
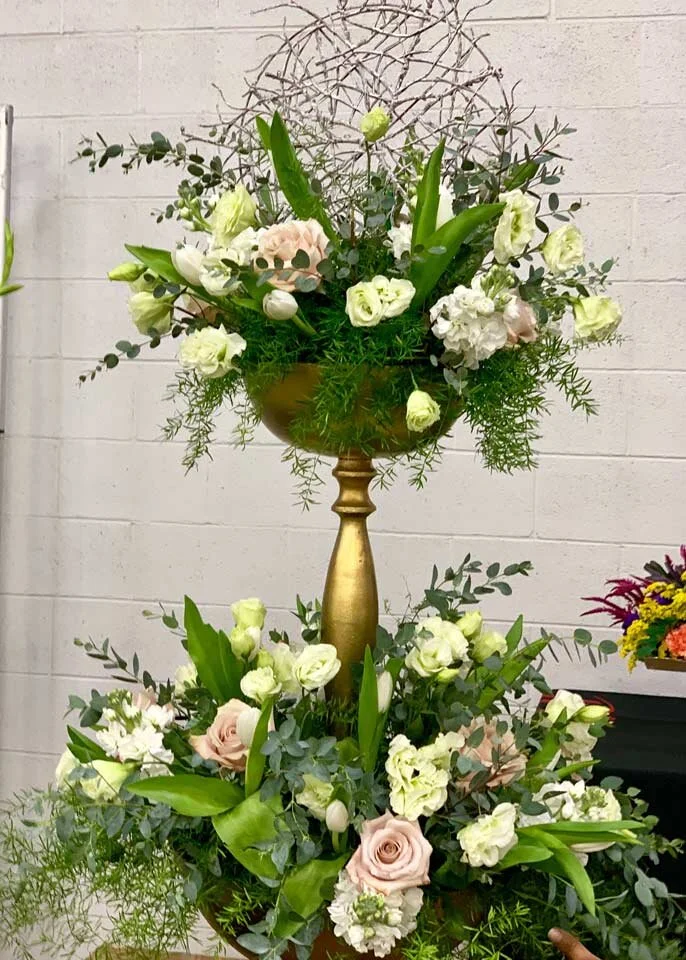
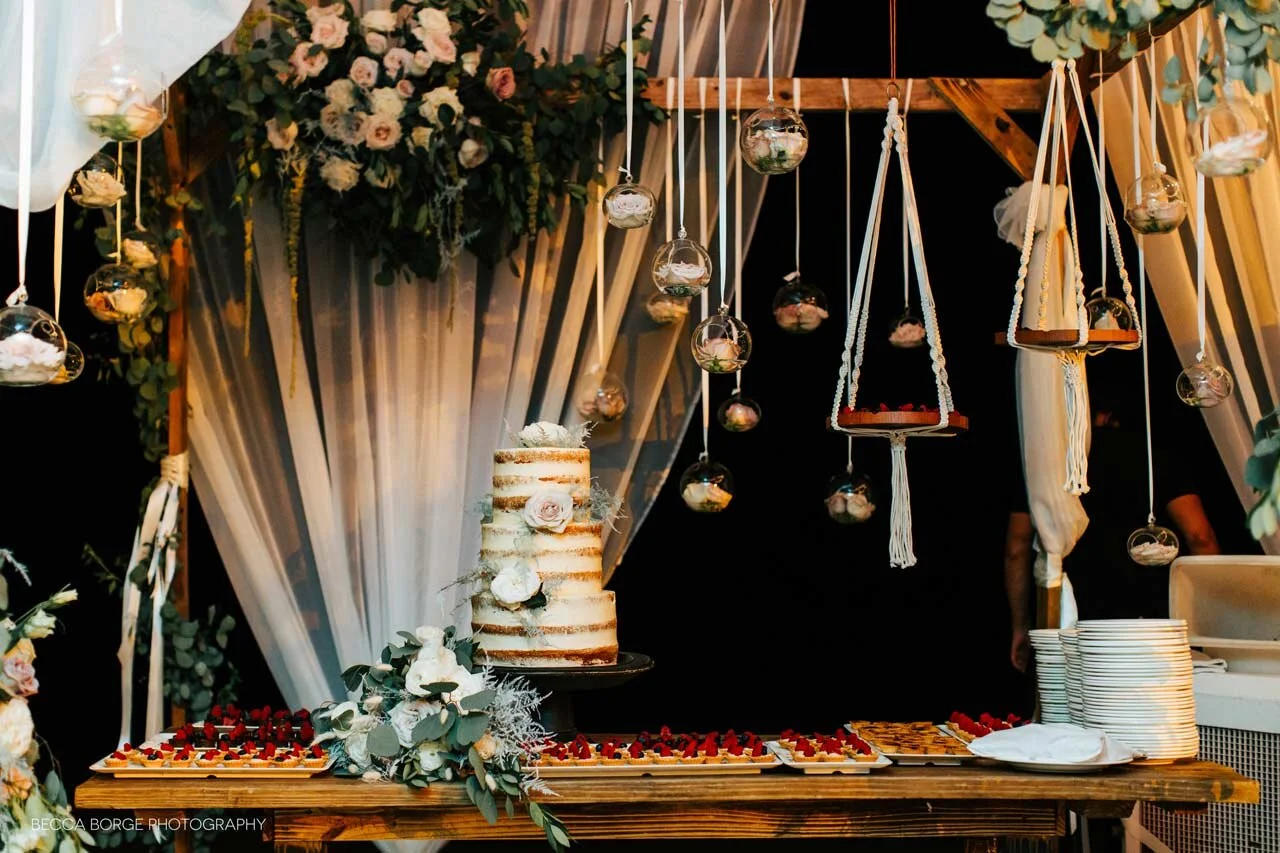
Utilizing your rental pieces in a unique way to create a beautiful display is a key to success. Reinventing these amazing cake stands into a design will enhance any dessert table.
Something old….
The structure was constructed using a plastic 6” flowerpot separating the two tiers of the cake stands. I then wrapped poultry wire around the pot and a cluster of it on the top tier. Make sure to fold in your end pieces so it does not damage the mirror. The wire is used to hold the floral in place for the design.

Something new….
Such a beautiful assortment of garden blooms:
Green Trick
Hydrangea
Stock
Wax Flower
Monte Casino
Astrantia

Something blue….
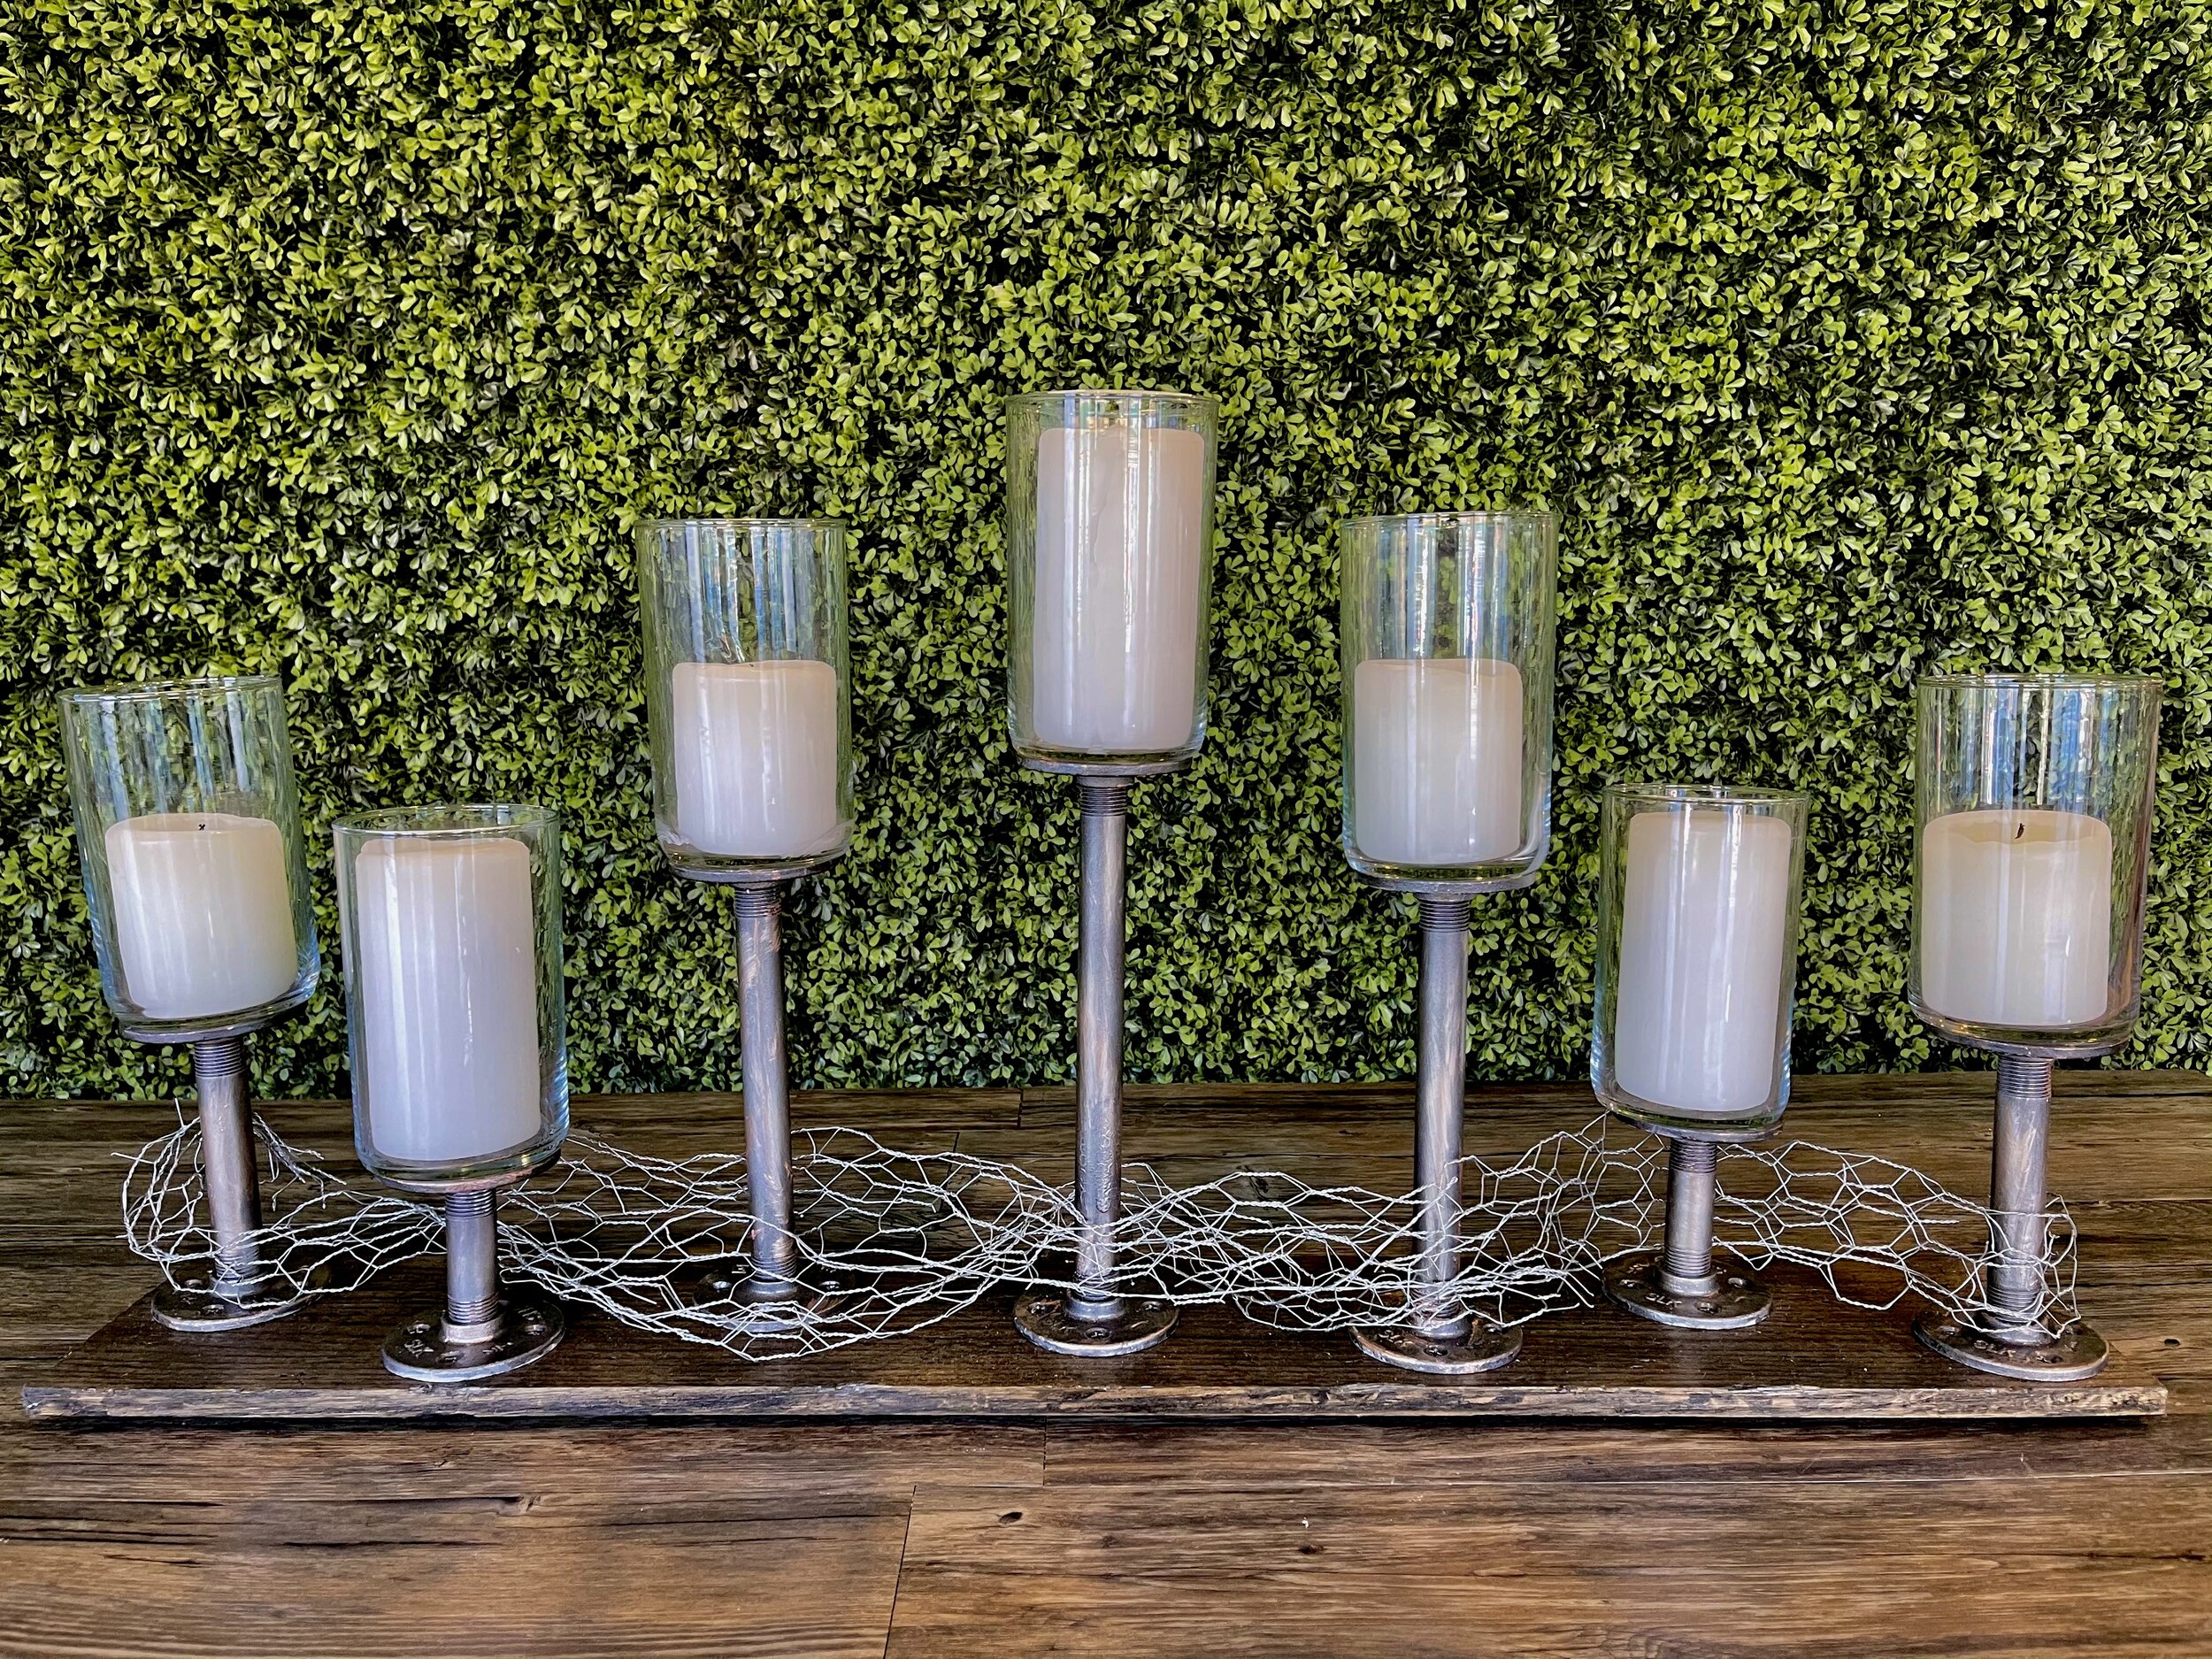
The design started with blue hydrangea and green trick as the base floral. These blooms would cover the gap between the levels and poultry wire. Water tubes were utilized to keep the hydrangea fresh.

Placing the blooms….
I placed the remaining blooms into the design. The poultry wire, hydrangea and green trick held the stems in place. Utilize water tubes on your more delicate blooms.

Finish the look….
To finish the display, place the wedding cake upon an additional cake stand. The design will be complete by adding coordinating blooms for the cake décor. A perfect display any couple would love to have on their wedding day.

Old, New, Borrowed & Blue
Such a beautiful way to celebrate love while utilizing what you have in stock!

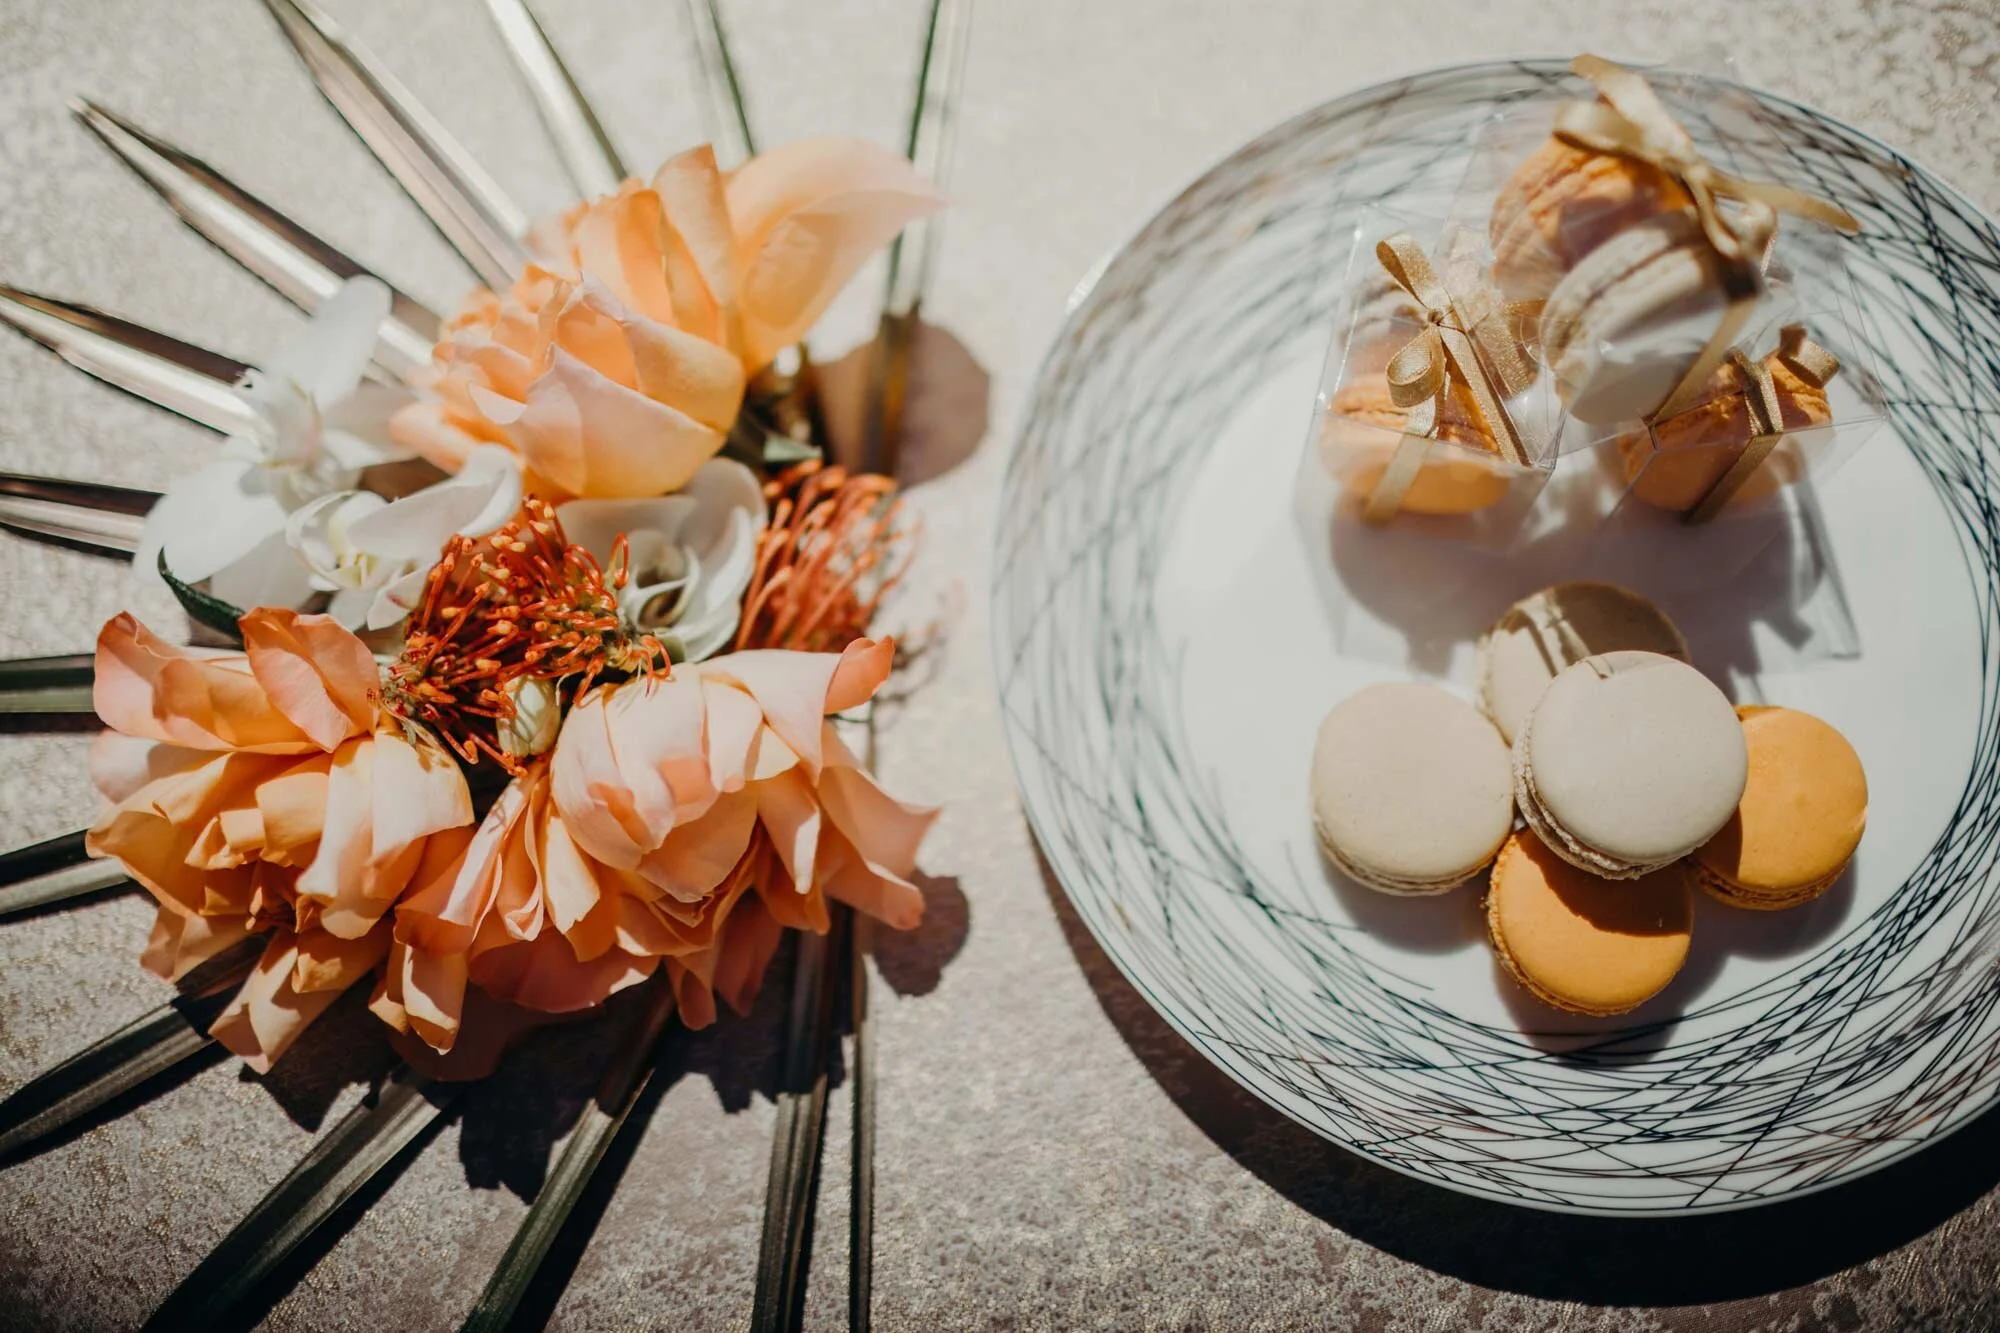
Pretty In Pink Winter Design
After creating the pink inspired bouquet, I thought why not design something inspired by the bouquet for the holidays! I was inspired by the color pink and winter ice for this holiday design.

Pink + Winter + Holidays = Fabulosity
After creating the pink inspired bouquet, I thought why not design something inspired by the bouquet for the holidays! I was inspired by the color pink and winter ice for this holiday design.

The cast for this show…
Some of the stars for this design are:
white painted branches
pink feather boa
bleached peacock feathers
ornaments
ruscus & silver dollar eucalyptus

Color me pretty….
I created a gypsophila garland and color enhanced it with Design Master Perfect Pink. So delicate yet so impactful.

Let the assembly begin….
First, I added chicken wire to the vessel to hold stems in place. I created a duo cascade down the side of the vessel by layering the pink feather boa on top of the gypsophila garland. Next, I inserted the peacock feathers off to the side for drama and white branches in the center of the design for height.

Color and movement….
I choose seeded eucalyptus and frosted ruscus because it had the perfect color and movement. The eucalyptus flowed beautifully over the vessel. The combination of the two foliages worked perfectly with our pink winter theme.

Flower power….
I utilized pink lisianthus, ivory roses, pink astrantia, pink scabiosa and white statice for this design. The shades of pink and white completely worked with the theme. Soft and delicate yet extremely impactful. Inserting the pink lisianthus down through the gypsophila garland increased the visual movement of the design.

Accented with frost….
I brought the holidays feel into this design by adding iridescent and crystalized ornaments to the design. The textures and colors are perfect for our theme. The perfect finishing touches!

Pretty in pink….
The perfect Pretty in Pink design for the holidays. This would be a favorite of anyone who loves a unique and nontraditional winter holiday arrangement. The feeling of the season is unique for everyone!

Happy Holidays and warm wishes for the New Year!

Understanding The Client’s Vision
Listening and understanding is key to your client’s happiness. When I meet with a couple, I ask them about their event vision, floral and design likes/dislikes, and their love story to create a one-of-a-kind wedding look specific for them. I believe in inspiration however as a floral artist it is up to us to create a custom design for our clients utilizing their dreams.
Listening and understanding is key to your client’s happiness. When I meet with a couple, I ask them about their event vision, floral and design likes/dislikes, and their love story to create a one-of-a-kind wedding look specific for them. I believe in inspiration however as a floral artist it is up to us to create a custom design for our clients utilizing their dreams.

Give them what they want….
This specific client requests were white floral, candlelight, multiple vessels, gold, glass and romance. Of course, my answer is YES, I would be happy to incorporate their vision into the final designs.
This is going to be a stunning wedding!

Picking the blooms….
For this tablescape I selected Playa Blanca roses, white peonies, white spray roses, silver dollar eucalyptus, and ruscus. The shades of white and guaranteed to add to the romance of the day.
I choose all round shaped blooms as I wanted a round compact floral arrangement for this centerpiece.
Playa Blanca are my go-to roses for wedding design. They open beautifully and are a strong rose choice.

Element by element the design comes to life….
Accent Décor Athena Candle Holders provide the visual weight for this tablescape. They are visual luxurious and the perfect shade of gold.
When selecting elements for the centerpiece I always take into account the room they will be going in. This specific room is luxurious with gold accents.

Glow….
I incorporated candlelight by adding pillar candles enclosed in cylinder vases to two of the candlesticks (tall and short). A beautiful floral display will be placed on the third candlestick.
You need to be educated on venues regulations when designing within their spaces. Example: many venues require all candles to be enclosed in glass.

Keep adding elements….
As the tablescape continued to come to life I will added 3 various height cylinders with pillar candles around the design. The success of this tablescape is the various levels being created by the vessels.

Bringing it down to the table….
The final hardgoods added to this tablescape was 8 votive candles. 4 will be mercury gold and 4 will be clear glass. I have grouped the candles (1 gold, 1 clear) around the display.
When the guests walk into the room they will be greeted by various heights of candlelight and floral. A perfect visual welcome!

Bringing in the green….
I prepared the floral elements by greening two arrangements with ruscus and eucalyptus. I utilized a 4” and 6” liner to hold the designs. For event work I prefer to utilize Oasis Midnight Floral Foam. I highly recommend this foam as it is easily covered and takes less product to create the final look.

Pretty petals….
Next, I added the floral elements. The Playa Blanca roses, white peonies, white spray roses were designed in a round and compact style. I wanted to ensure I did not block the candlelight with the floral. It ia all about enhancing each element to complete the final cohesive look.
When designing for a wedding I prefer to have the floral elements hydrating for 4 days prior to designing. This will ensure the blooms open and are healthy for the final designs.

It all comes together….
I loved utilizing all the couple’s requests for this design. By listening and understanding you will be sure to create the dream day the couple envisioned.

LOVE….
This is a picture of the sample floral. I can not wait for the wedding day to fill the room with floral!

Reimagine, Reuse, Repurpose
How often do you reimagine your rental items? Have you thought about a different design you could create to increase rental? Take time to create a new design for your existing rental items. By renting items you will increase your bottom line and be more successful.
How often do you reimagine your rental items? Have you thought about a different design you could create to increase rental? Take time to create a new design for your existing rental items. By renting existing items you will increase your bottom line and be more successful.

Client comes first….
A client reached out to me for their annual holiday event. They were in need of a floral display for an estate table. Their requests were candlelight and a spin on traditional holiday decor. Of course, the answer is always “yes, I would love to design for your event”.
Understanding client needs/vision and incorporating them into the design has always been a top priority for me. Without our clients we can not do what we love to do!
Inspired by your surroundings….
As I looked around the design studio, I was inspired by a structure I had designed previously. I had created this base for a YouTube video we created earlier this year. I knew it would be perfect for the event.
I started by weaving chicken wire through the pipes at the base. This would ensure the arrangement would be secure.

Enhance your elements….
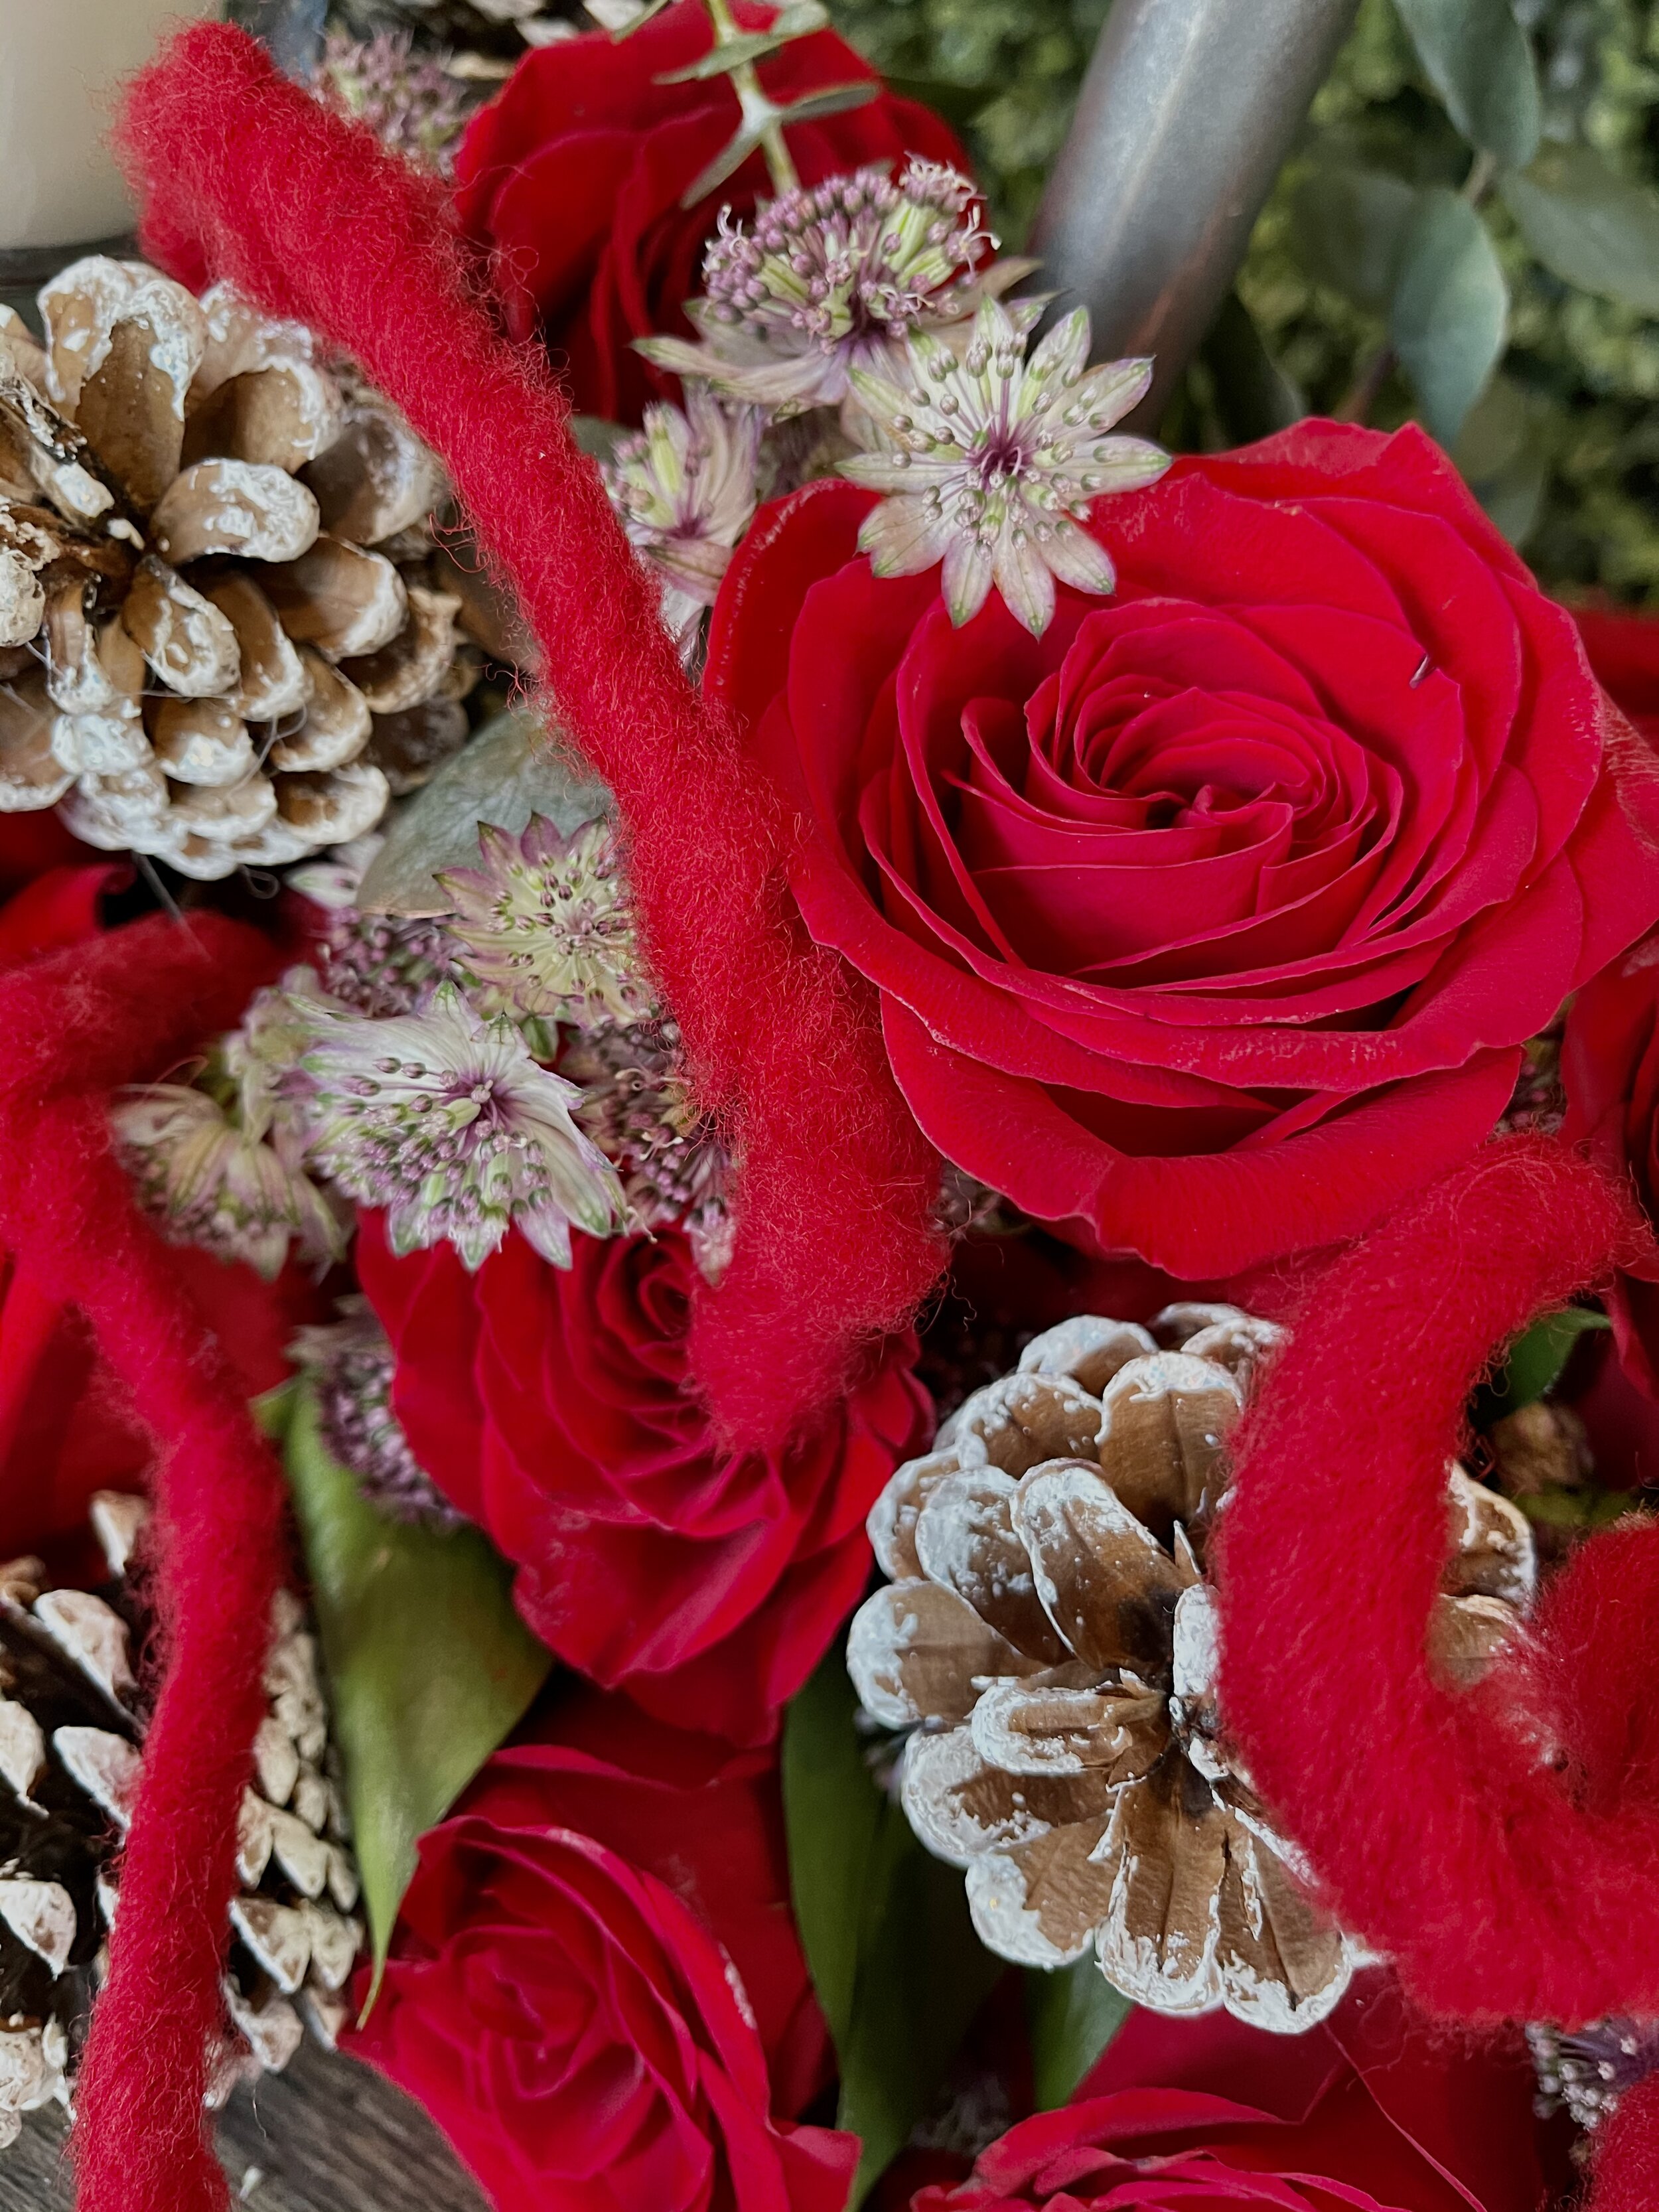
The next step was to enhance my foliage. I utilized Design Master Copper to color enhance the ruscus and eucalyptus. I sprayed a light mist of copper onto the foliage allowing some of the natural color to shine through. I chose copper as it would coordinate with the metallic color already on the structure and be enhanced by the candlelight.

Adding the star elements….
I then inserted the foliage, roses, astrantia and Knud Nielsen pinecones to the structure. I utilized small water tubes for the roses. The chicken wire held everything in place perfectly.
Soften the design….
As I looked at the design, I felt a softer texture needed to be added. I found the perfect solution… Oasis Wired Wool! I cut 10” strands of the wool and inserted it into the design with a bit of Oasis Floral Adhesive. By cutting the wool I had more control over the desired placements.

Time to celebrate….
Once completed it was the perfect showstopper to the event. My client loved it as much as I did. I had created an unique design utilizing a custom base that the guests admired throughout their event.

Designing Original Floral Art For Your Clients
Creating an inspired statement bouquet is key to your client’s happiness on their perfect day. The completed design should be inspired by your client and designed as a one-of-a-kind piece of floral art that they are happy to carry down the aisle.
Creating an inspired statement bridal bouquet is key to your client’s happiness on their perfect day. The completed design should be inspired by your client and designed as a one-of-a-kind piece of floral art that they are happy to carry down the aisle.

Pretty in Pink…
When a bride asks for a “Pretty in Pink” feminine bouquet the answer is always yes. Yes, I will design the most beautiful bouquet that represents your style and vision for your wedding day.

Picking fabulous blooms….
First step is picking the perfect blooms for the bouquet. I chose to utilize roses, veronica, lisianthus, scabiosa and gypsophila. Utilizing shades of white and pink were key to bringing this bouquet to life.

Enhancing the natural beauty….
I started by color enhancing the gypsophila with Design Master colortool spray. The color chosen was Perfect Pink for this bouquet. When painting the floral, I focused on highlighting the floral without saturating the entire stem. I wanted some of the white to remain to highlight the pink.

Movement and structure….
Utilizing a pink feather boa was key to adding femininity and movement to the bouquet. As the bride walks down the aisle the feathers will dance in the breeze. Using a mechanic such as the Syndicate Sales Pillow will provide structure for the bouquet.

Power of the collar….
I started by gathering the gypsophila around the pillow to create a collar. The pillow will keep the gypsophila in place around the focal floral while providing a space to insert the floral product.

Placing the blooms….
Floral placement is key to completing the perfect bouquet. The roses and lisianthus were designed tight within the bouquet to create the base. I then placed the scabiosa a bit higher and finished with the veronica coming out of the floral to add depth to the finished bouquet.

Time to walk down the aisle….
I finished this bouquet by adding the pink boa around the back of the gypsophlia collar. The perfect “Pretty in Pink” bouquet.

Does It Have To Be Traditional?
Does it have to be traditional is a question many of us deal with. I tend to believe that you can pay homage to tradition yet modernize the design. When a fabulous client asked me to create autumnal design in a modern way I said of course YES.
Does it have to be traditional is a question many of us deal with. I tend to believe that you can pay homage to tradition yet modernize the design. When a fabulous client asked me to create autumnal design in a modern way I said YES.
.

What to start with….
The design was to be a floral runner for a 8’ rectangle table consisting of foliage and white accents with lots of candlelight and metallic elements. I knew right away I wanted to start with white pumpkins. They are the perfect focal to this tablescape.

Enhance your elements….
Because I wanted to add a moment of shimmer to the pumpkins, I decided to gold leaf sections of the pumpkins. The gold leaf added a metallic element to the design and the candlelight looked fabulous reflecting off of the gold.

Glow….
By mixing metallics you provide a visual interest to your design. The mercury gold and copper candles greatly enhanced the final design. You will notice in the final images I utilized some of the copper candle holders as pedestals for pumpkins.
Texture….
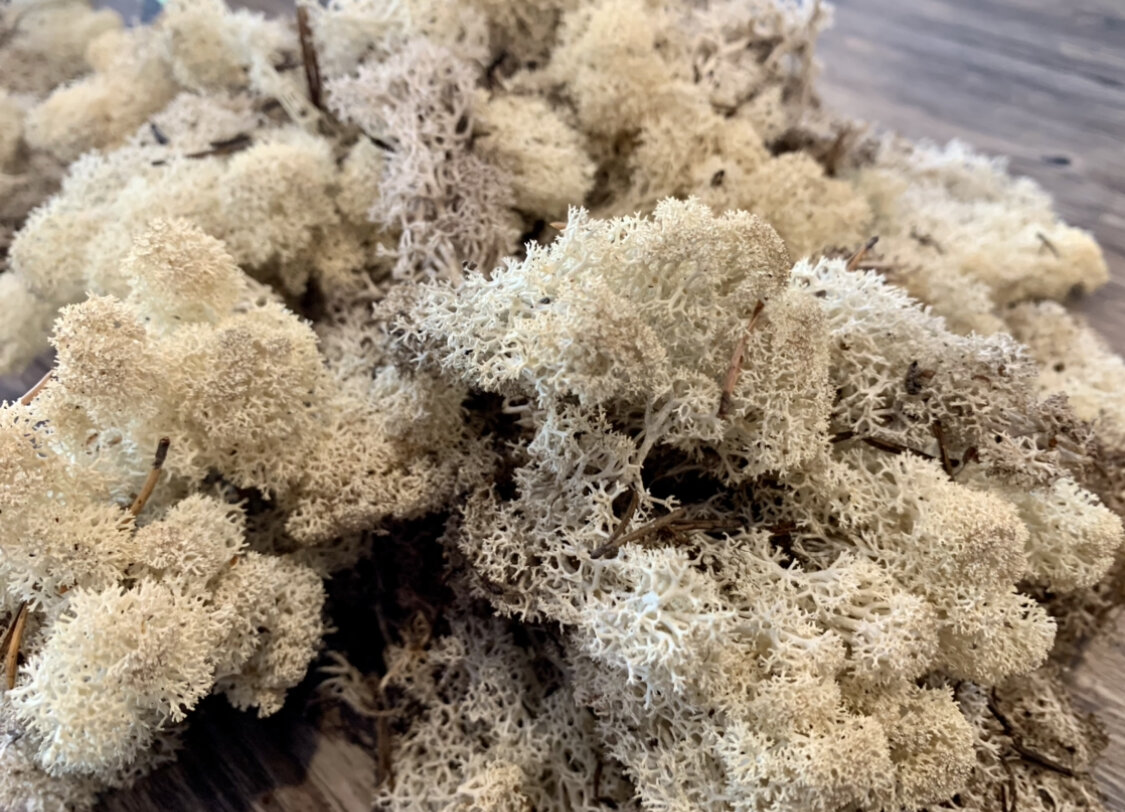
Because I was not planning on using much color I counted on textures to play a huge role in the final design. This gorgeous Reindeer Moss from Syndicate Sales in white was perfect for the design!

Unique Elements….
I wanted to use oak leaves in the design as it is a traditional autumnal element however I did not want the traditional colors. These fabulous Transparent White Oak Leaves from Knud Nielsen were the perfect answer!

Moments of green….
Every time I bring green dianthus into designs people love it. The question I often hear is “are they real….what are they?”.
By utilizing unique elements in your design it will ensure people stop and admire your work for longer periods of time. It is all about appreciating the art of floral!

All about the layers….
The tablescape came to life by layering:
podocarpus
gunni eucalyptus
green dianthus
white oak leaves
reindeer moss
candles
pumpkins

It was a perfect setting!
Remember to think outside of the box. As a floral artist it is up to us to create unique designs to be admired by our clients. Pay homage to the past by utilizing elements to create a bright future!

Designing For Your Clients
When design for the wedding of Nicole and Jack the thought was be unique. They asked me to come up with a design plan that would be trendy and unique for their wedding day. Their original venue had cancelled due to the pandemic, so plan B was the family home. It was going to be a fabulous wedding filled with love and floral/foliage décor.
When creating the design plan for the wedding of Nicole and Jack the thought was to create a design plan that reflects their story. They are a fun loving couple who strives to live life to the fullest. They asked me to come up with a design plan that would be trendy and unique for their wedding day. Their original venue had cancelled due to the pandemic, so plan B was the family home. It was going to be a fabulous wedding filled with love and floral/foliage décor.
.

It’s all about the elements!
The staircase was to be a major design moment for their big day. I wanted to design something a bit different than the usual draped garland for the couple so I designed hand-tied bouquets of monstera, palms and eucalyptus to be zip tied to the banisters.

Making a statement with tropical foliage!
The stairway was a perfect entrance for the guests and the ultimate photo opportunity. It is all about creating those special moments that inspire awe. We must remember that after the day has come to an end the one thing left of the wedding day is the images captured by a lens and in their hearts.
Carry the decor theme throughout the event!
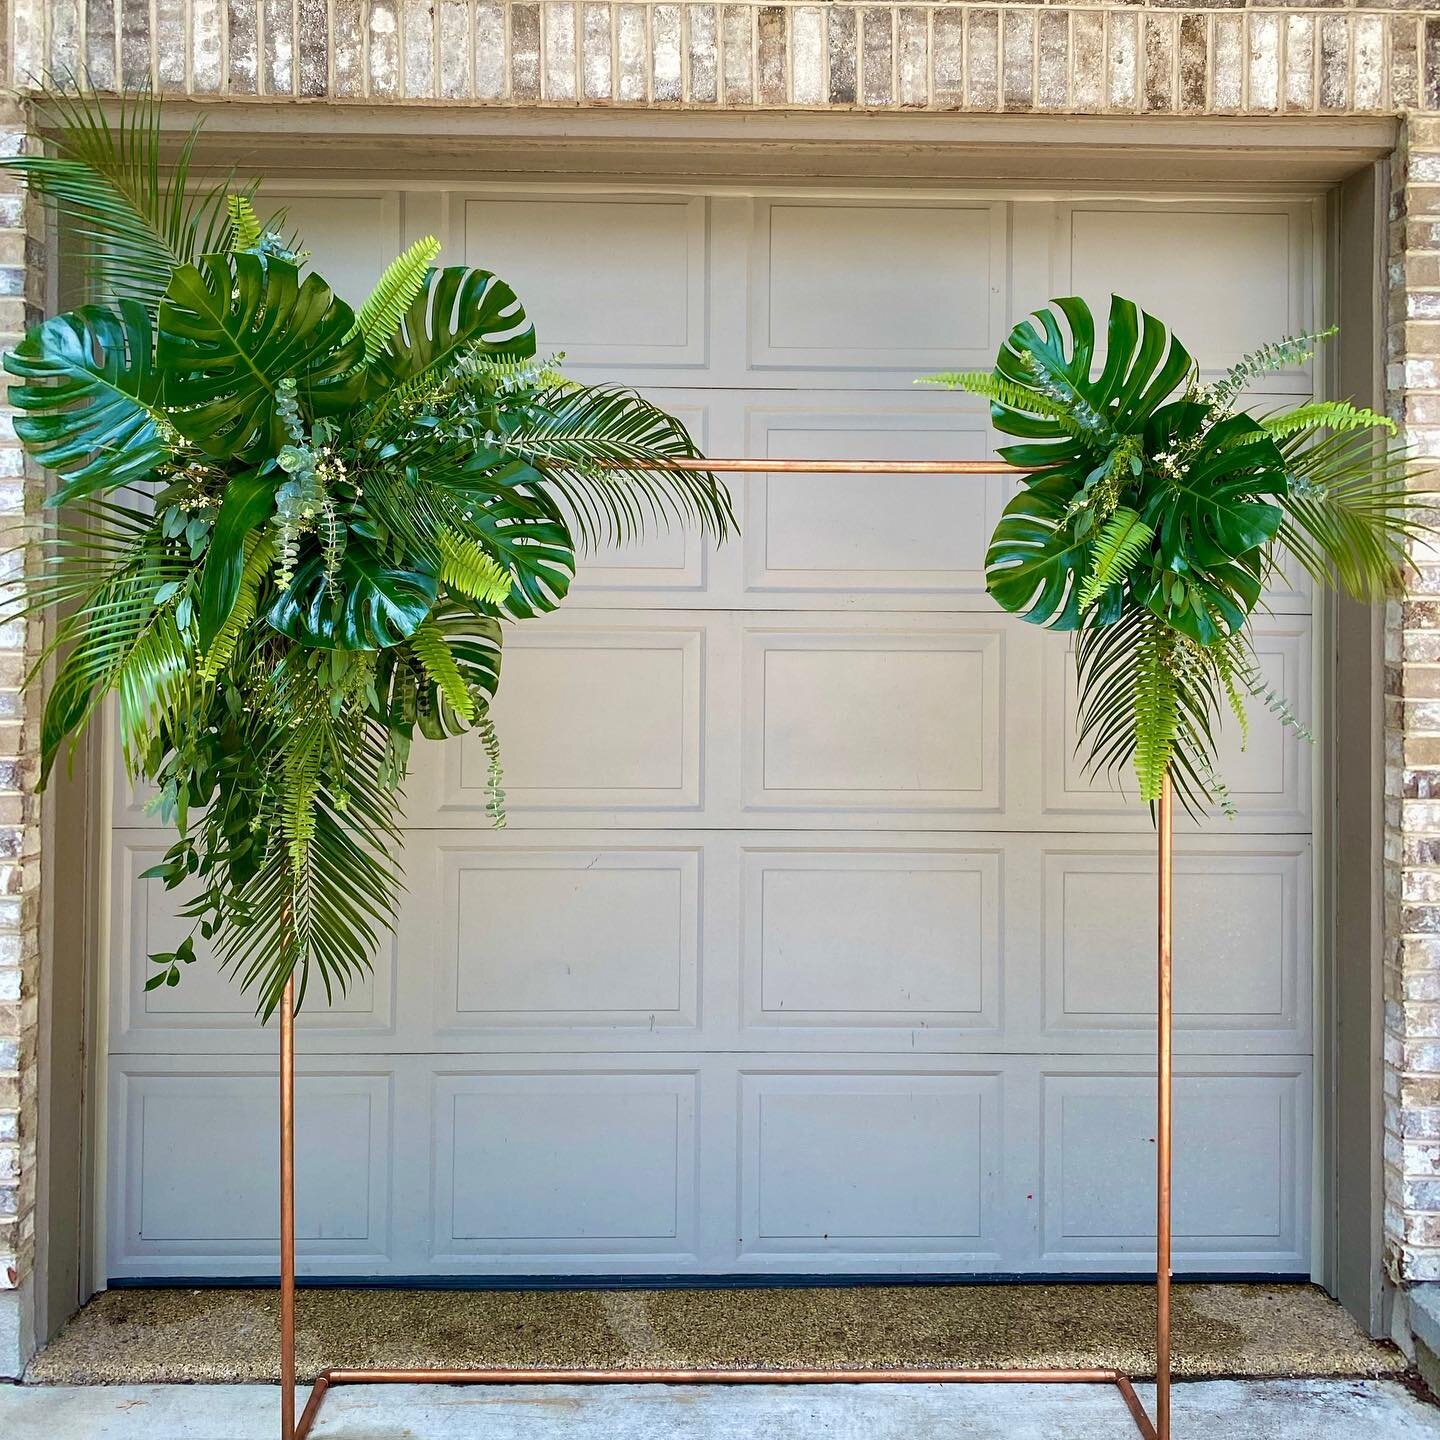
The ceremony was going to be taking place in their backyard. We utilized a copper stand to create the altar for the “I Dos”. The larger spray was designed in an Oasis Jumbo Cage consisting of monstera, palm, and ferns. The smaller spray was designed in an Oasis Corso Holder consisting of monstera, palm, and ferns.
(No the display did not stay in front of the garage….it was moved to the backyard closer to the ceremony time.)

The Bouquet!
The bridal was to carry a bouquet consisting of tropical foliage, green mini hydrangea, white peonies and white anemones designed within a Syndicate Sales Pillow. The pillow holds the stems perfectly in place.

Decor maintains unity at an event!
Floral/foliage décor was placed throughout the home. This helped transition the family home to wedding venue. It was the perfect place to start a marriage.

Happily Ever After!
Every love story deserves its special day told in the way that best reflects the couple. It is our job as floral artists to create the magic for them.

Microwedding…..Is All About Love!
The definition of microwedding is any ceremony and/or reception with less than 50 total guests. Does the word micro have impact on the importance of the day? It has the same essential components. Most importantly there is LOVE. These components have all come together to celebrate a wedding, so I say we call it by the independent and strong name…. WEDDING. There is nothing “micro” about LOVE.
The definition of microwedding is any ceremony and/or reception with less than 50 total guests. Does the word micro have impact on the importance of the day? Why not just call it a wedding? Why do we have to label it micro? A wedding of 10 vs 400 people has the same essential components. First there is a couple who wants to spend their lives together. Then the celebration of their union begins which includes family/friends who want to wish the very best to the start of a new beginning. Often there is plenty food/beverage, music, photos and beautiful floral (of course). Most importantly there is LOVE. These components have all come together to celebrate a wedding, so I say we call it by the independent and strong name…. WEDDING. There is nothing “micro” about LOVE.
.

Design the perfect setting to say “I DO”!
I have had the honor of designing some amazing weddings during this time of uncertainty. When asked by our couples to help design their wedding day the answer is always YES because love is always is something to be celebrated.
Danielle and Jeff decided the perfect location for their venue change was the family home. It was a beautiful sun filled day to set up the ceremony outside. Safely of course!

Make a statement for the couple!
We designed a beautiful moongate consisting of lilies, alstroemeria, roses, garden roses, snapdragons, and monte in shades of white and peach. The springri and plumosa created the movement within the design. When designing outside it is important to understand how the air movement will affect your floral display. Use nature to create magic.

Simplicity creates drama!
The Bride’s mother purchased the candle holders to be placed down the aisle. We added #9 and #3 double satin ribbon streamers on each candle stake. A symphony of movement happened when the breeze made an entrance. The simple touches often add the most impact.

Time to Dine!
The table décor was a series of candles and cylinder vases of peonies, roses, hypericum, viburnum, and green trick. There were candles galore placed in between the series of floral. A tablescape can have major impact by utilizing a series of floral and candles.
Photo credit: Chi-Town Weddings

Floral To Carry and Wear!
I designed a beautiful round garden bouquet consisting of peonies, roses, spray roses, garden roses, dahlias, viburnum, and eucalyptus for the bride to carry towards her forever love. I specifically chose all round shaped items for her bouquet to create the shape. I paid special attention to the colors as I wanted a gradual increase of color from ivory to apricot. There was no sudden pop of color…. it was a beautifully romantic transition of colors for this bride.
The groom’s boutonniere was designed with hypericum stem wrapped in satin ribbon with an accent of bullion wire. The color looked great against his navy-blue suit.
Photo credit: Chi-Town Weddings

Happily Ever After!
Every couple deserves your full attention to detail and design abilities. After all it is their dream day….no matter how many people are able to attend. Make it a day they will remember forever!
Wishing Danielle and Jeff the happiest of marriages filled with love, laughter and floral!
Photo credit: Chi-Town Weddings

Surviving The Pandemic With Design
During the week of March 9,2020, I was at our state floral convention. Earlier in the week we started to see the country shutting down to help control outbreak. As the weekend progressed, I started getting emails from clients that they were cancelling or postponing their events. This was the tip of the iceberg and it was becoming real fast. As the convention ended and we were on our way home Sunday it was announced that Illinois would go into shutdown to help control the number of positive cases and deaths. My business and future were to be changed forever.
There are moments in your life that will forever change you. The outbreak of the COVID-19 pandemic was certainly to be one of those life altering events. Although we thought we knew what was coming none of us had any idea what the reality was to be.
When the world starts to change!
During the week of March 9,2020, I was at our state floral convention. Earlier in the week we started to see the country shutting down to help control outbreak. As the weekend progressed, I started getting emails from clients that they were cancelling or postponing their events. This was the tip of the iceberg and it was becoming real fast. As the convention ended and we were on our way home Sunday it was announced that Illinois would go into shutdown to help control the number of positive cases and deaths. My business and future were to be changed forever.
As the time started to progress, I could see everything I had built being destroyed. 2020 was going to be the best year of my career. No matter what was to happen I would not let go of creativity and my love of the floral industry.
How surviving a pandemic is like the stages of grief and how I combated it with design:
Stage 1: Denial
I would spend time telling myself “this can’t be happening”, “events will begin next month”, “summer events will happen for sure” to name a few. I could not and would not believe that our lives would be forever changed.
I started designing on Facebook live early on. I wanted to show beauty through all the chaos, and it was a great way to see my friends from around the world.

Stage 2: Anger
Now I became angry not only at the virus but also by the lack of help for small businesses. I was angry at the fact that a virus was responsible for the potential loss of not only my business but so many businesses. Business was going to change, and I knew in order to survive we must all change as well.
I worked with Dan from yes.I.said to finalize my website. Time was going to continue, and I wanted to be ready for the future.

Stage 3: Bargaining
How do you bargain with a pandemic? The answer is you can’t! Of course, I had the “what if we had not prebought event hardgoods for the year” and “if only we built our savings stronger to prepare for a pandemic”. Useless way of thinking and so not productive.
As I continued producing Facebook live videos, I continued to find strength in my floral community. The one thing we all had in common was that the pandemic was affecting us all. The beauty of floral design would give the strength to carry on.

Stage 4: Depression
I am thankful for my daughter, husband, and friends during this time. We helped each other navigate through this all the while trying to plan for our futures. There were many days in the beginning and honestly, I still have these days of hopelessness, but we must never give into the despair. The light will shine again.
Fighting against depression is not easy. One thing I know for sure is that we need to stay strong and look for the light. At this point I started working with JFConcepts to develop my YouTube channel. Let the filming begin.

Stage 5: Acceptance
This is a new reality for all of us and now is the time to act. At this point I had the time to focus on what I love and also what I have put off doing. I had revamped my website, started a YouTube channel, provided online classes for designers, finalized projects, did all the things I have been putting off in the design studio, and prepared as best as I could for an uncertain future.
We may not know what the future holds, but one thing I do know is that my love of the floral industry will be a constant part of my life. Designing and sharing my passion with all of you has provided me the strength to sustain my business. I thank all of you for standing strong and supporting each other during this horrific time. We will all bloom again!
Say yes to staying strong and developing a bright future for yourself.

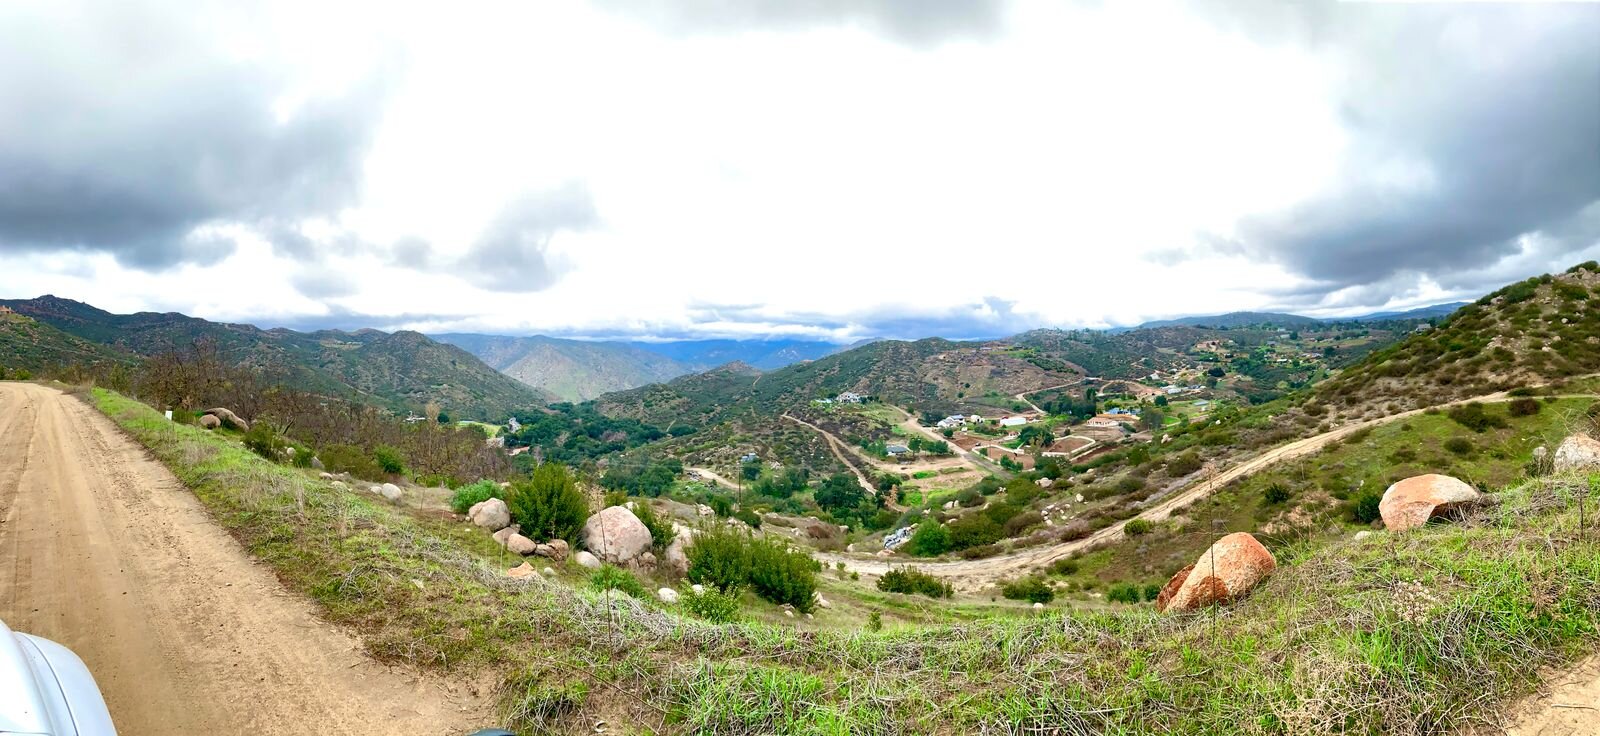
Where It Grows:Visit To Bandy Ranch Floral
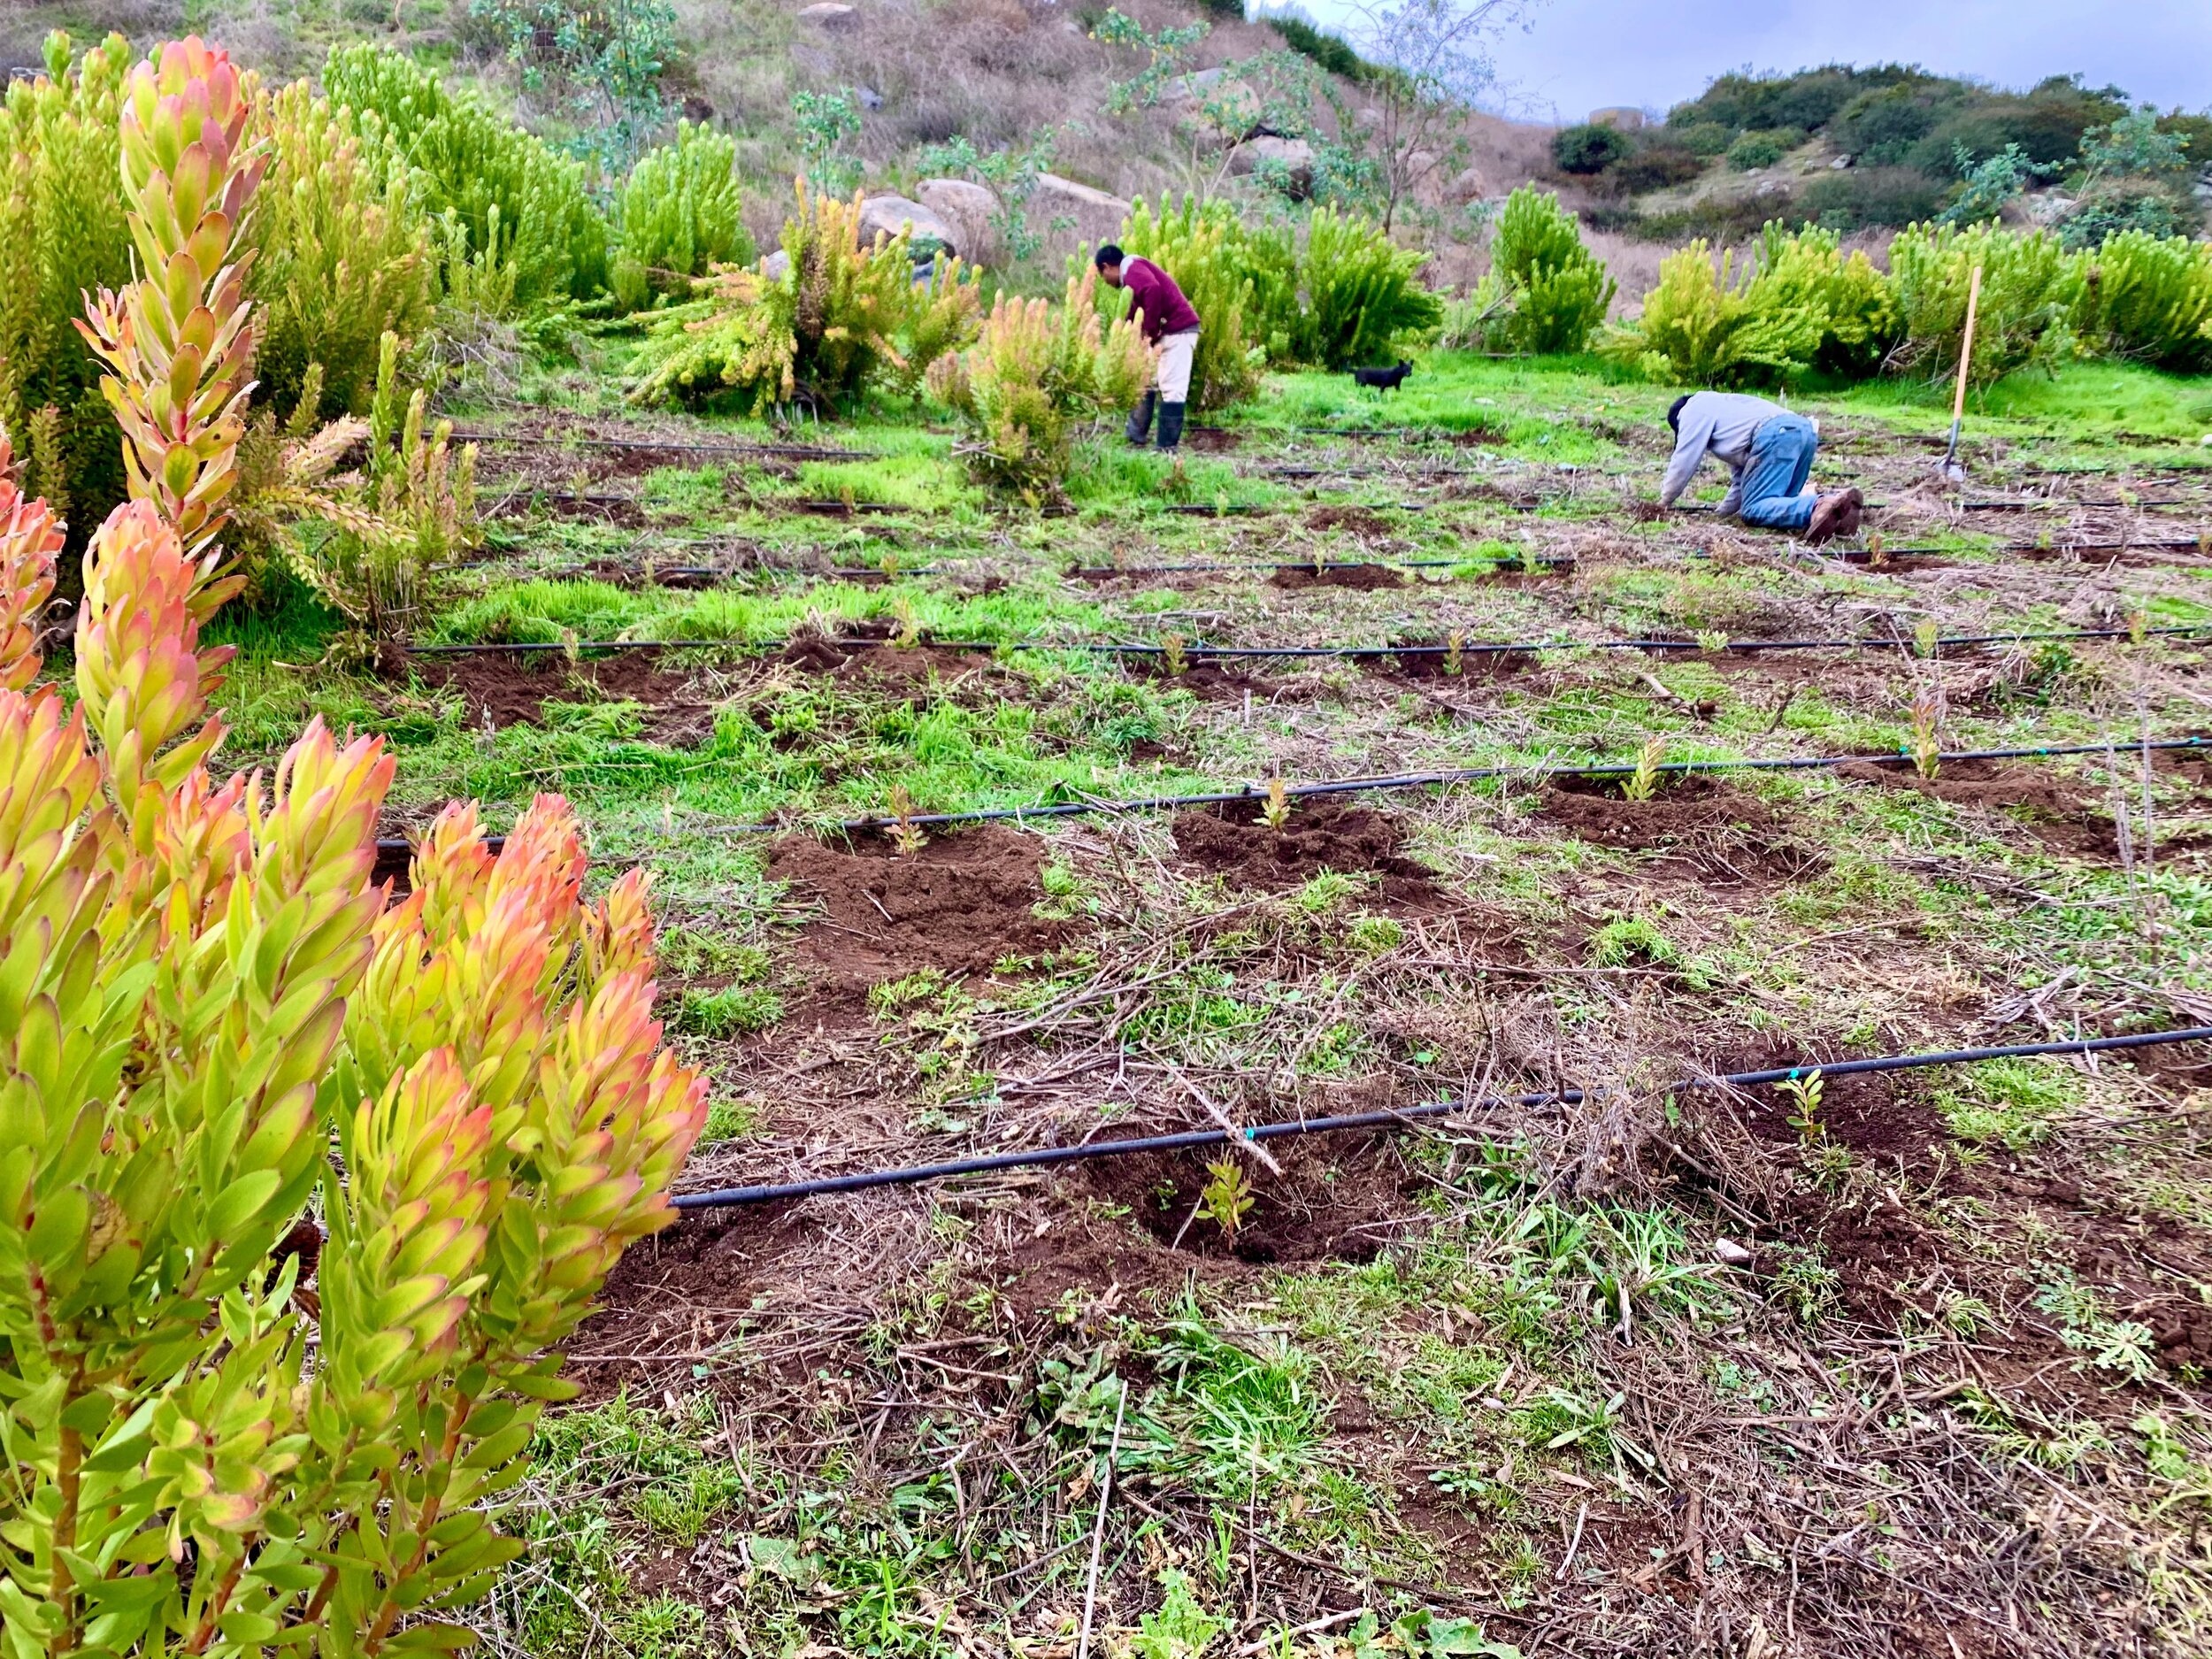
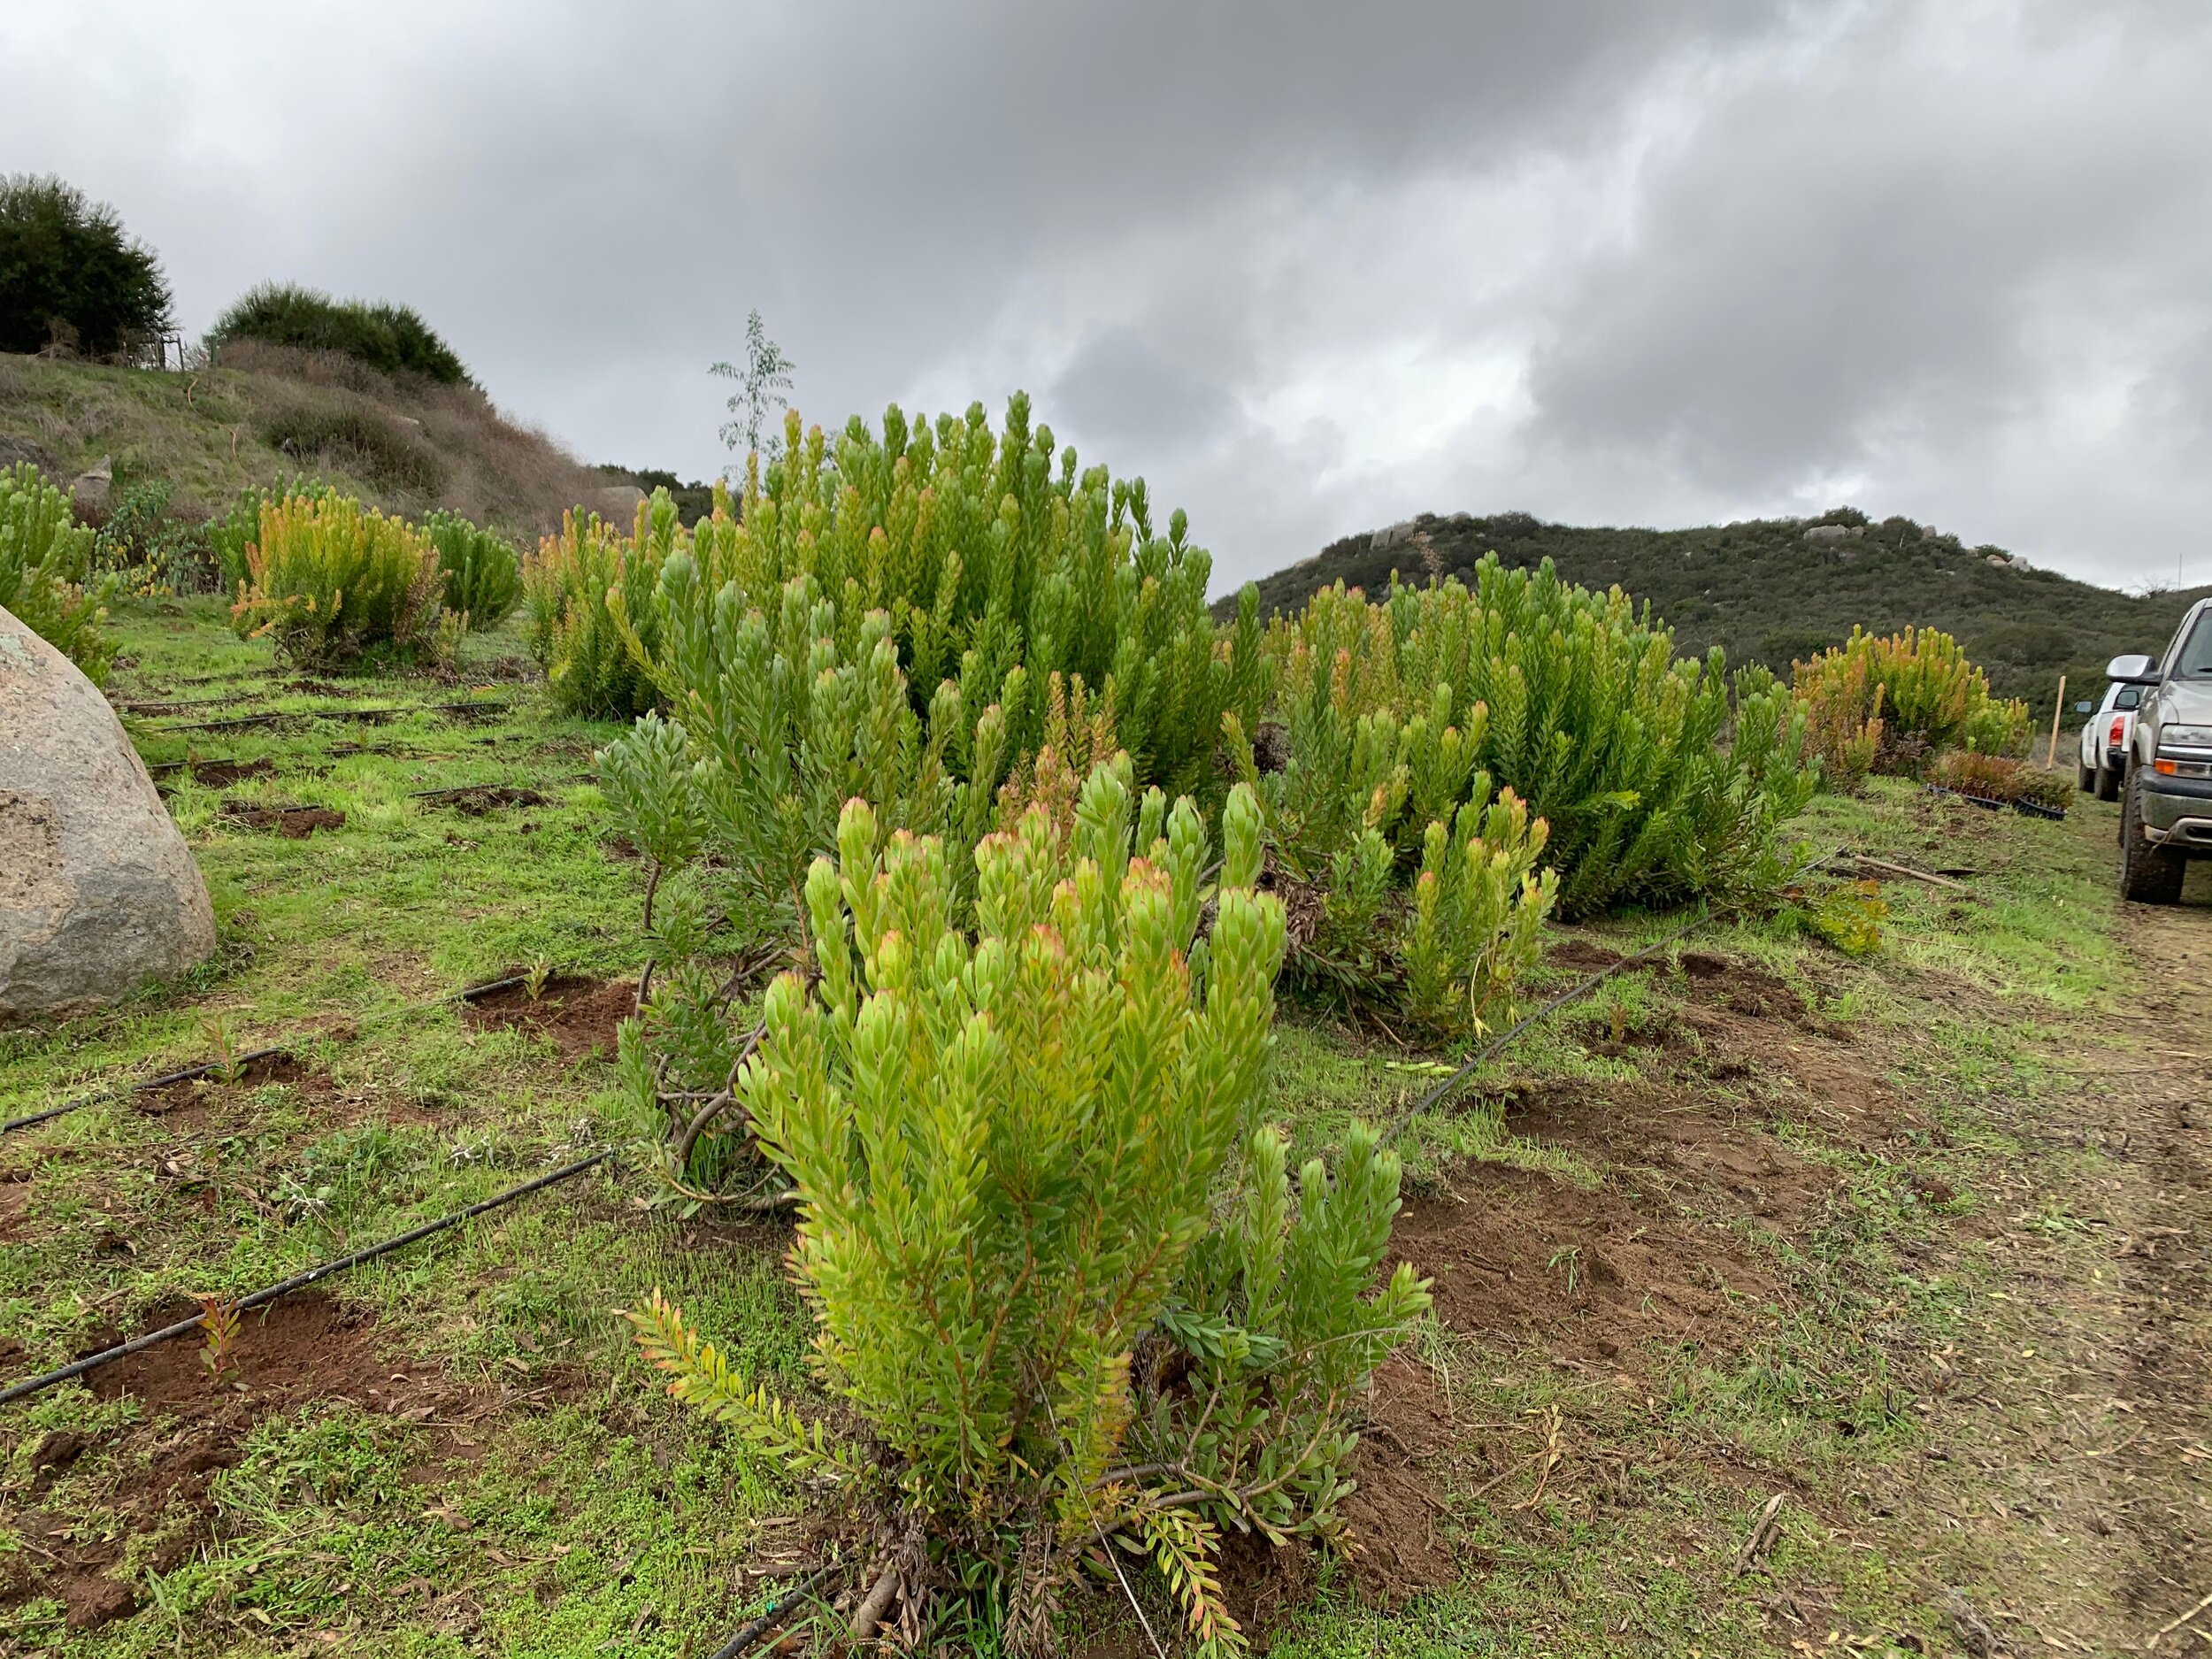
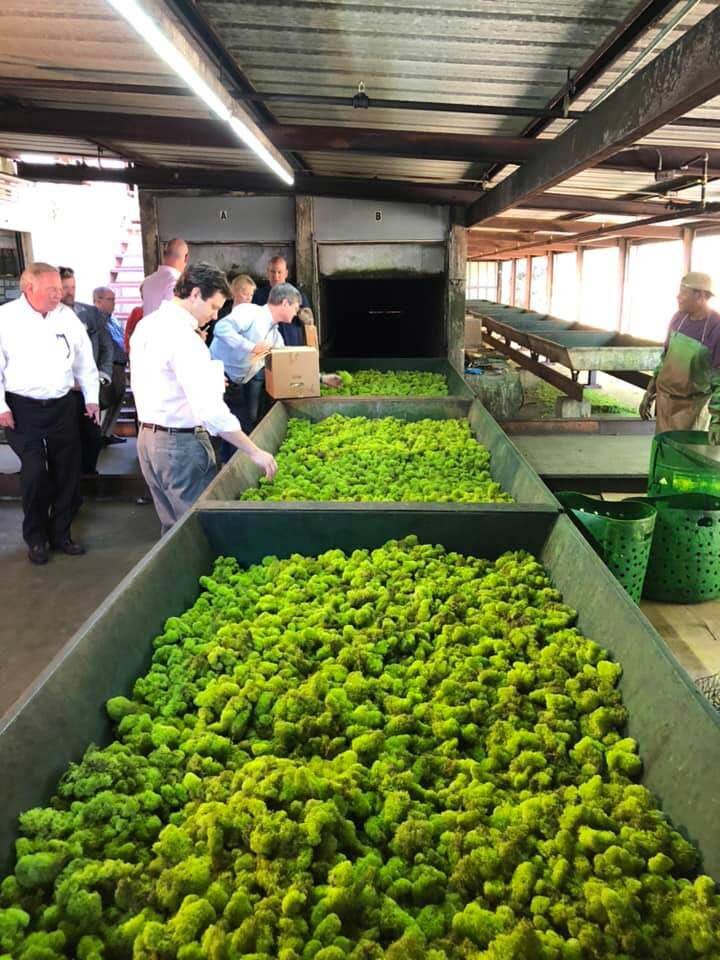
As part of the Bandy Ranch Floral family, I was able to tour the enormous fields in which their beautiful product grows. Steve (BR owner) took me on a tour of their properties on one of my trips to California. ‘Magnificent’ does not do it justice nor do the images captured by a camera lens. The farmland is something you need to see to believe.
Seeing where the product we love grows from the earth is a wonderful experience. I think floral artists take for granted all the hard work and years of planning it takes to grow the items we make beautiful floral creations with. It does not just happen. There is planning, propagation, irrigation, care, harvesting, processing, packaging and transporting before it ends up in our hands. Bandy Ranch is doing it with love!
As part of the Bandy Ranch family, I was able to tour the enormous fields in which their beautiful product grows. Steve (BR owner) took me on a tour of their properties on one of my trips to California. ‘Magnificent’ does not do it justice nor do the images captured by a camera lens. The farmland is something you need to see to believe.
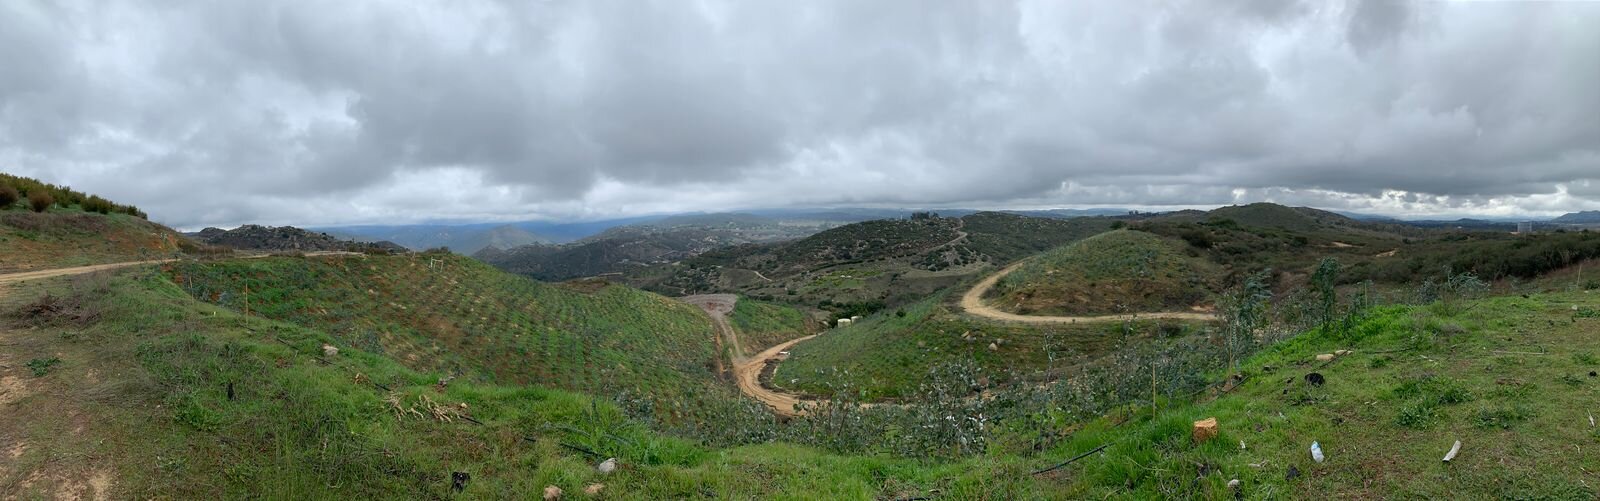
Steve explained to me the planting process as well as the irrigation system they installed. I was extremely impressed by how earth conscious Bandy Ranch is. They understand the need to conserve water and recycle when possible. The things we cherish most are grown from the earth and we need to respect it.

When was the last time you were able to stand in a field of waxflower…. this was the first time for me!
Back at the facility, Steve and Rosie showed me up close and personal the product and how they continually provide fresh and environmentally friendly product to their customers. This husband and wife duo work hard to make sure BR runs smoothly and efficiently while providing amazing product and employing many hard-working individuals.

Portion of the Bandy Ranch Warehouse
A few of their items are shown below: leucadendron, protea, eucalyptus varieties, boxwood, ranunculus and waxflower were gorgeous.


I am sure it gives Steve and Rosie a warm heart knowing all of their beautiful floral/foliage that is grown with love will end up bringing a smile to someone’s face they never met. Share the love of flowers and you share the love of creation!

It is a pleasure to work with Steve and Rosie at Bandy Ranch. These are the moments I will continue to treasure, and I am so thankful my floral journey has led me to their door.

Share Your Passion: Rio Roses at Baisch & Skinner
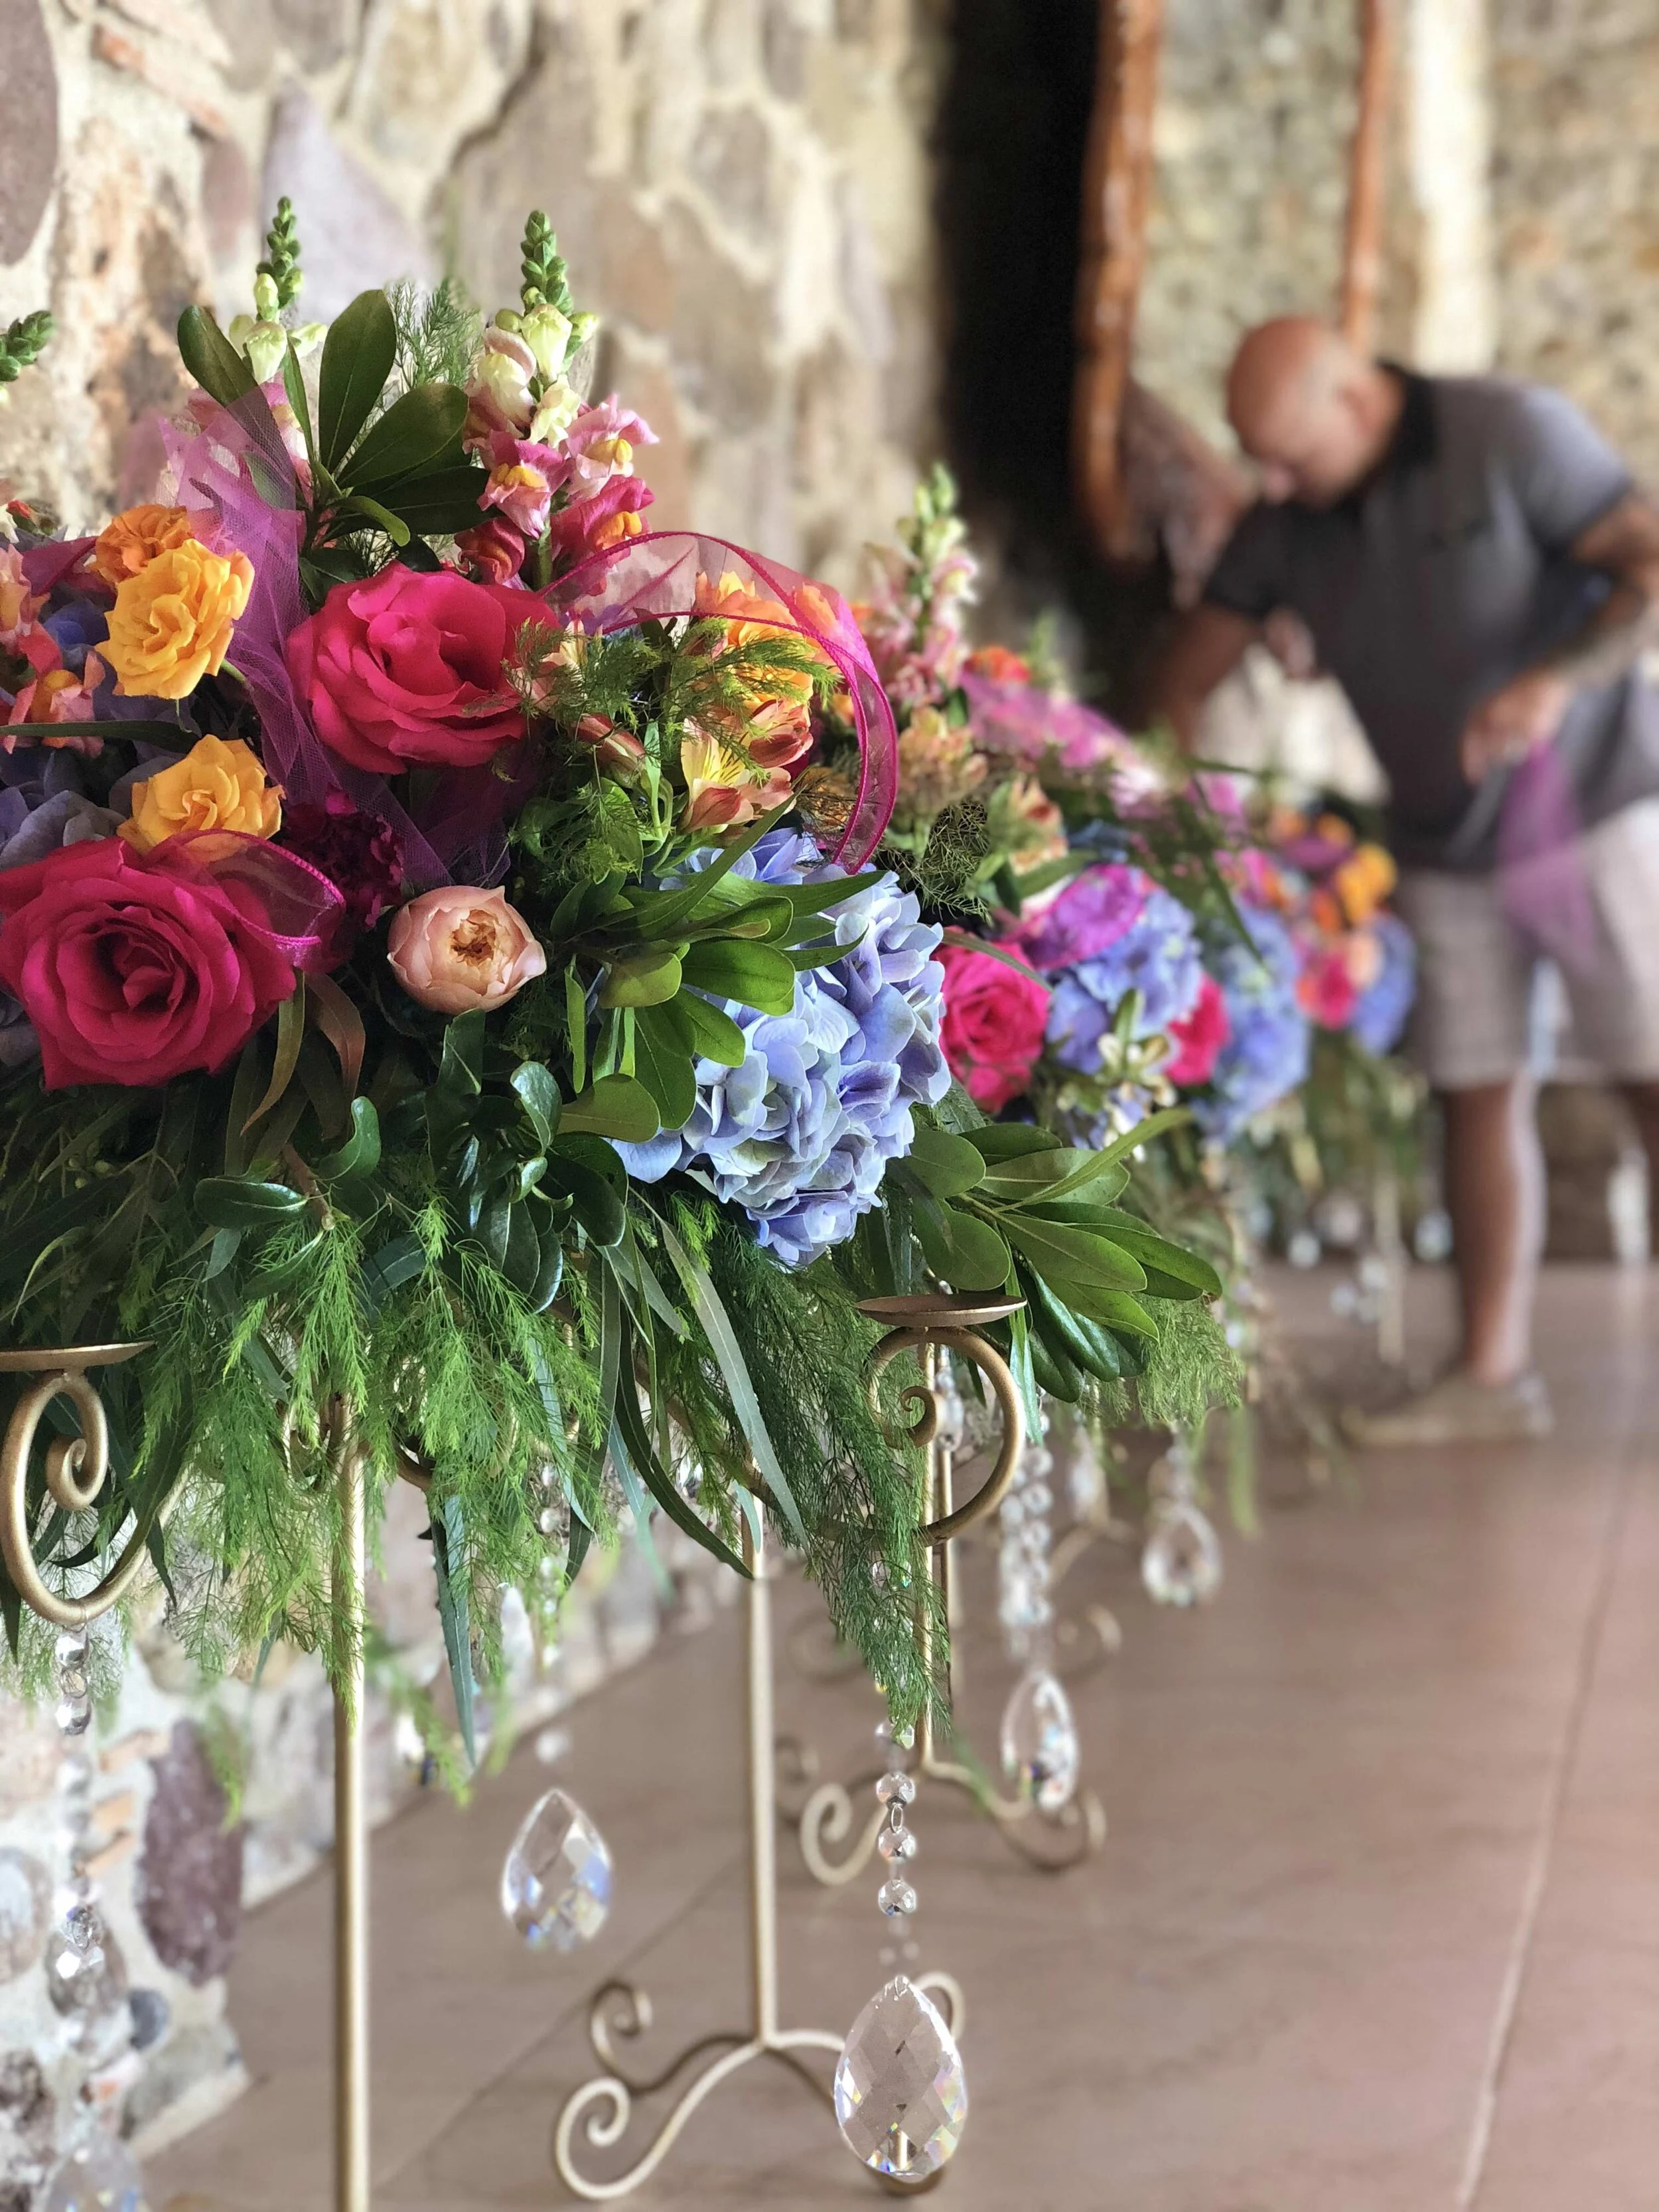
Sharing my passion is a part of my career that I treasure. Being able to talk about product, design and business to other floral peeps in something I treasure. Having the amazing product of Rio Rose and location of Baisch & Skinner certainly makes my passion easier to share. This journey was all about the wedding industry and how to repurpose your rental items.
This adventure began with a call from Rio Roses asking if I would be interested in presenting two shows at Baisch & Skinner locations highlighting wedding design. I know Rio has great product and Baisch & Skinner are amazing to work with. YES, to both!

The first show was to take place at Baisch & Skinner in St. Louis Missouri. They have an amazing education center there devoted to the advancement of the floral industry. Because it was close to one of my friends, Michelle O’Neal-Babicky, who happens to be an amazing floral artist I called her to assist and she said YES.
I choose to showcase rental items that could be utilized in a different way. Making revenue on existing items will help your business go further.
The below items show how to create a unique registration table display. Oasis floral mesh cascaded from a large wooden vessel to hold place cards for the guests to retrieve. The table was accented with a dried pod vessel holding florets and cotton.
This segment also showcased an Accent Décor Biltmore stand floral arrangement that could be displayed on an estate table.
A guest table floral arrangement and accenting candle holders completed this set.


Flowers for a modern garden
The next set-up was a modern garden display. We started the designs with a large metal vessel containing assorted floral, moss orbs, and dried materials that can be used to create an altar, registration table or placed on either side of head table.

Flowers for a dessert station
This piece was my take on a dessert station. By utilizing different vase textures, shapes and sizes with assorted blooms will help continue the garden theme. Think about repurposing your items for other events which in turn adds revenue to your bottom line.

One of my favorite pieces of the show was this antique cabinet. It would be a great place for card receiving or accent piece at ceremony/reception or memory of those past. I pictured this cabinet coming from grandma’s house and having floral overflowing from drawer would be a great way to pay tribute to those you love.

A bold color story
My final segment was about color. Do not be afraid to utilize color when it comes to events. Create a bold color story for your next bridal show and see how many people notice the beauty.

Turning a silver pedestal into a stunning display with the use of color blocking creates drama.

This silver stand consisted of 3 stacked containers upright. I twisted the stand so the vessel would be at different directions and continued with the color blocking of floral. This would be a fun guest table arrangement.

The below containers were originally white. We color enhanced them to create a pattern with Design Master paint. All of the foliage was also color enhanced with heir paint as well. They we continued on with the grouping on floral to create a very nice statement piece that could enhance any backdrop or create a photo opportunity for your clients.

This was a great show with an amazing audience!
Come with me if you wanna go to Kansas City…
Now it was time to pack up start our travels to Kansas City, MO.
We shipped items from St Louis to our next show at Baisch & Skinner in Kansas City, MO. Of course, I wanted to design some new things to add to the collection for our guests.

The first segment had the addition of a beautiful bouquet designed with roses, silver dollar eucalyptus, salal accented with Oasis pearls.
Another piece was designed by placing two stands upright with cascading floral to create a stunning alter piece, registration piece or guest table arrangement.
A great statement piece was designed by placing a wire wreath base upon a gold stand. We then added multiple ribbons (double satin, sheer, lace) cascading down with a foliage arrangement displayed on top.

The next segment received an addition of a bold and beautiful bouquet. The highlight (besides the stunning floral) was the garland I created using Oasis bullion wire with paper hearts I cut out of a book to be wrapped within the design.

The below version of a chandelier was created using a wire vase base they had in store. I wrapped it with permanent botanical foliage garland and added fresh floral product to complete the design. Never be afraid of mixing permanent botanicals with fresh product as it always creates a stunning end design.
We learn so much form being together, and I am grateful you choose to spend your evening with me.
Thank you!

Not Always Easy, But Always Beautiful: Designing a Bahamas Wedding
Designing a wedding in paradise certainly is a dream come true. The thing about dreams is that reality can often not be seen at the moment. Although there are many advantages to designing a wedding on an island there are also some obstacles. This article will tell you the story of overcoming obstacles to achieve a masterpiece.
When asked to design a wedding at the Pink Sands Resort in Harbour Island, Bahamas my first answer was YES. Then came the questions of how this is going to come together started. I am comfortable designing at my studio in Chicago because all the comforts of design are around me. If I need anything extra, I can easily go and get it from local sources. That was not going to be the case on an Island. I knew I needed strong designers to travel with me to work with the amazing local talent on the island
All the product (floral, foliage, hardgoods) needed to be shipped to the island ahead of our arrival in a large temperature-controlled trailer. To get the 6,000 stems of roses, 6,500 stems of foliage and assorted flowers, assorted vases, hardgoods and dried materials we needed months of preparation. It was a huge undertaking that involved many people to successfully complete the task.

The journey begins
Working away from home brings many surprises. My team (Tina Davis AIFD & Michelle O’Neal-Babicky AIFD) and I took two planes to get to the Eleuthera, one bus to get to the dock, one boat to cross the waters to arrive at Harbour Island, and a golf cart to bring us to the venue. It was a day excitement and we hit the ground running.
We arrived on Monday for a Saturday wedding and each of those moments were needed to create the final masterpiece. We began setting up our work room and working through all the beautiful product. There were guest homes to decorate, lobbies to adorn with floral, welcome receptions to decorate, and the final masterpiece the wedding!


Not everything was sunny and bright. As we moved from our work room to the beach to begin setting up the tent a surprise storm came in and had other plans for us. We laughed and took shelter on the beach as the storm passed and back to work we went.


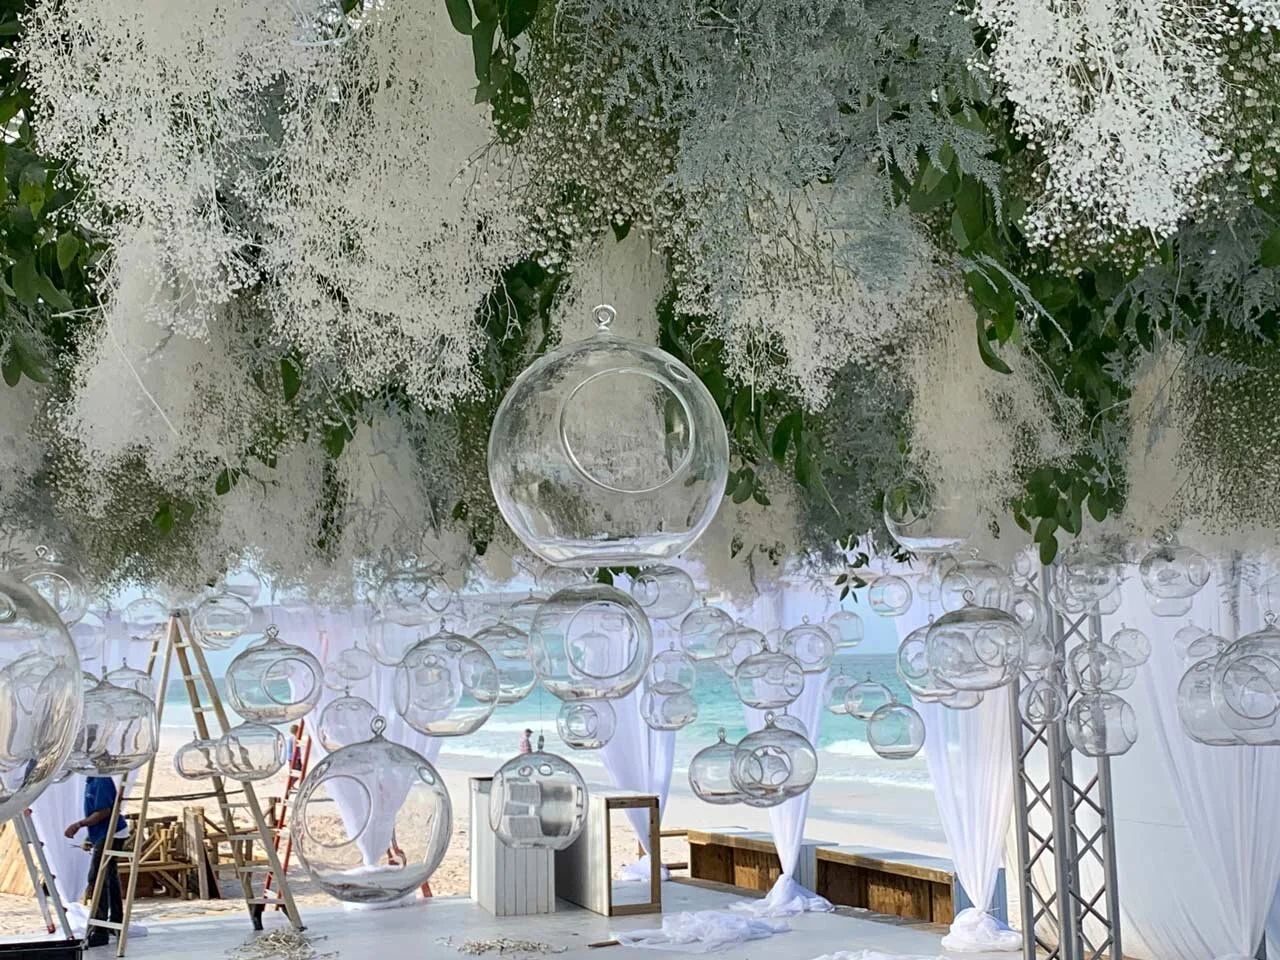
As the storm passed, we had to reset and install the focal piece for the reception. It was to be a hanging garden consisting of smilax, cases of Knud Nielsen bleached gyp, fresh gyp and hundreds of hanging glass Accent Décor orbs with candles. It was simply breathtaking when completed and the party danced under the garden all night long.


Transporting the floral was done via golf cart—we smiled and laughed the whole way. Island life at its best!
Now was time to set-up the ceremony. We had a fabulous arbor to decorate and 190 feet of pathway that was to have floral on each side to complete in time for the bride to make her entrance!


Next was to complete the teepees, entrance to reception tent, guest tables, dessert station, beverage stations and so much more. Once completed, we stepped back and realized this is what dreams are made of.


All was set for the bride and groom to have the wedding of their dreams!

Our week of design was complete the trailer that once held all of our items from the USA is now completely empty.

As my team travels back to the states, I can’t help but to be thankful for an amazing opportunity to design a dream wedding at a dream location with a dream team. Nothing is ever done alone, and we must always be thankful for those we have shared moments with.
Team
Tina Davis, AIFD
Michele O’Neal-Babicky, AIFD

Training Tour With The Elite Bouquet
Education is key to success. Join me on a training tour to share the beauty of floral with one. Elite Flower is a huge supporter of the idea of training to succeed. They understand that growing stunning floral is the start of the process. Designers need to learn techniques to be successful with the gorgeous stems.
Larry from The Elite Bouquet called and asked if I would take part in a training tour… of course, I said YES! I have always loved being part of The Elite Flower family and was happy to take part in this educational event. I would be sharing my love of floral design with 120 designers from California. We had 5 classes scheduled in Reno, Elk Grove, Fremont, Sacramento and Napa. Lots of miles driven between each stop. This was going to be fun!
Classroom was set with all the fabulous fresh product from Elite and hardgoods from Oasis. This was going to be a treat for us all.


My passion is to share my love of floral design with anyone who will listen. I enjoy instructing classes and seeing the look on their faces when they learn a new technique or are inspired to create. I am grateful that Elite has the belief the floral education is the way to success. We spent our days discussing design, care and handling, trends, and selling practices.


Once a class ended, Larry and I would load up the car and drive to the next city. He was so great taking me on the scenic routes so I could witness the beauty of nature. It was many miles, but the views, conversation and laughter made the time slip away.

After I told Larry I never been to a baseball game he felt the need to take me to one. It was a learning experience and fun time for me, but Larry had to be exhausted when it was over. Although I still don’t understand the throwing of peanuts onto the floor! LOL


The Power of Weddings: Two Shows At The TSFA Floral Forum
Weddings are a huge source of income for the floral industry. It is not only about the stunning design but how are you inspired to make it personal for the couple. It is not only about the end result but how does your business practices influence the success of your weddings. Read on to learn how this journey to TNSFA brings a wedding business and design program to their members.
This journey takes me to Franklin, Tennessee (right outside of Nashville) to present two shows for the TSFA Floral Forum. When I was invited to showcase wedding bouquets and a business program based on weddings my answer was of course YES. I have been to the Tennessee State Florists Association convention in the past and I know they have an amazing convention. The board works tirelessly and believe that education is the pathway to success.
My first show was about wedding business called “The Path to I Do”. I wanted to discuss the business side of weddings from advertising to completion of events. My stage style is one of conversation. I feel we all learn from each other if we dialogue about topics.

How to attract potential couples
The first items I spoke about was how to utilize opportunities to reach new clients. Without having clients, we can not a wedding division of our businesses.
I then spoke about the consultation process itself. We tend to forget that this is the most important day for our clients. We need to devote the energy and time to making sure it is the best experience for them from the moment the meet with you until the moment they say I Do.


Next, I spoke about the importance of a great contract. Everyone business who offers wedding design needs to have a contract. It does not matter if you do one wedding or hundreds a year. Take the time to write a contract to not only protect yourself, but also to protect your clients.
Below are a few of the contract items we discussed.


The Power of the Bouquet
The first evening was full of knowledge and the desire to be a more successful floral company. The second show was to focus on the wedding bouquet called “The Power of The Bouquet.” Wedding bouquets are a huge passion for me. It is the last item the bride will cling to as she walks towards her forever love. If done right it will showcase their love story and design of the wedding day.
I had an amazing assistant Pattie and FFA students working with me in the workroom. Such a great team to be part of.
Where do you draw inspiration from? Is it magazines, Pinterest, social media outlets, other designers? Inspiration is everywhere all you have to do is open yourself to the possibilities. Below are descriptions of what inspired me as I designed some of the bouquets for the show.

Inspiration: bleached dried materials from Knud Nielsen. I wanted to design a light and airy bouquet utilizing bleached materials. We enhanced the bouquet with wool garland.

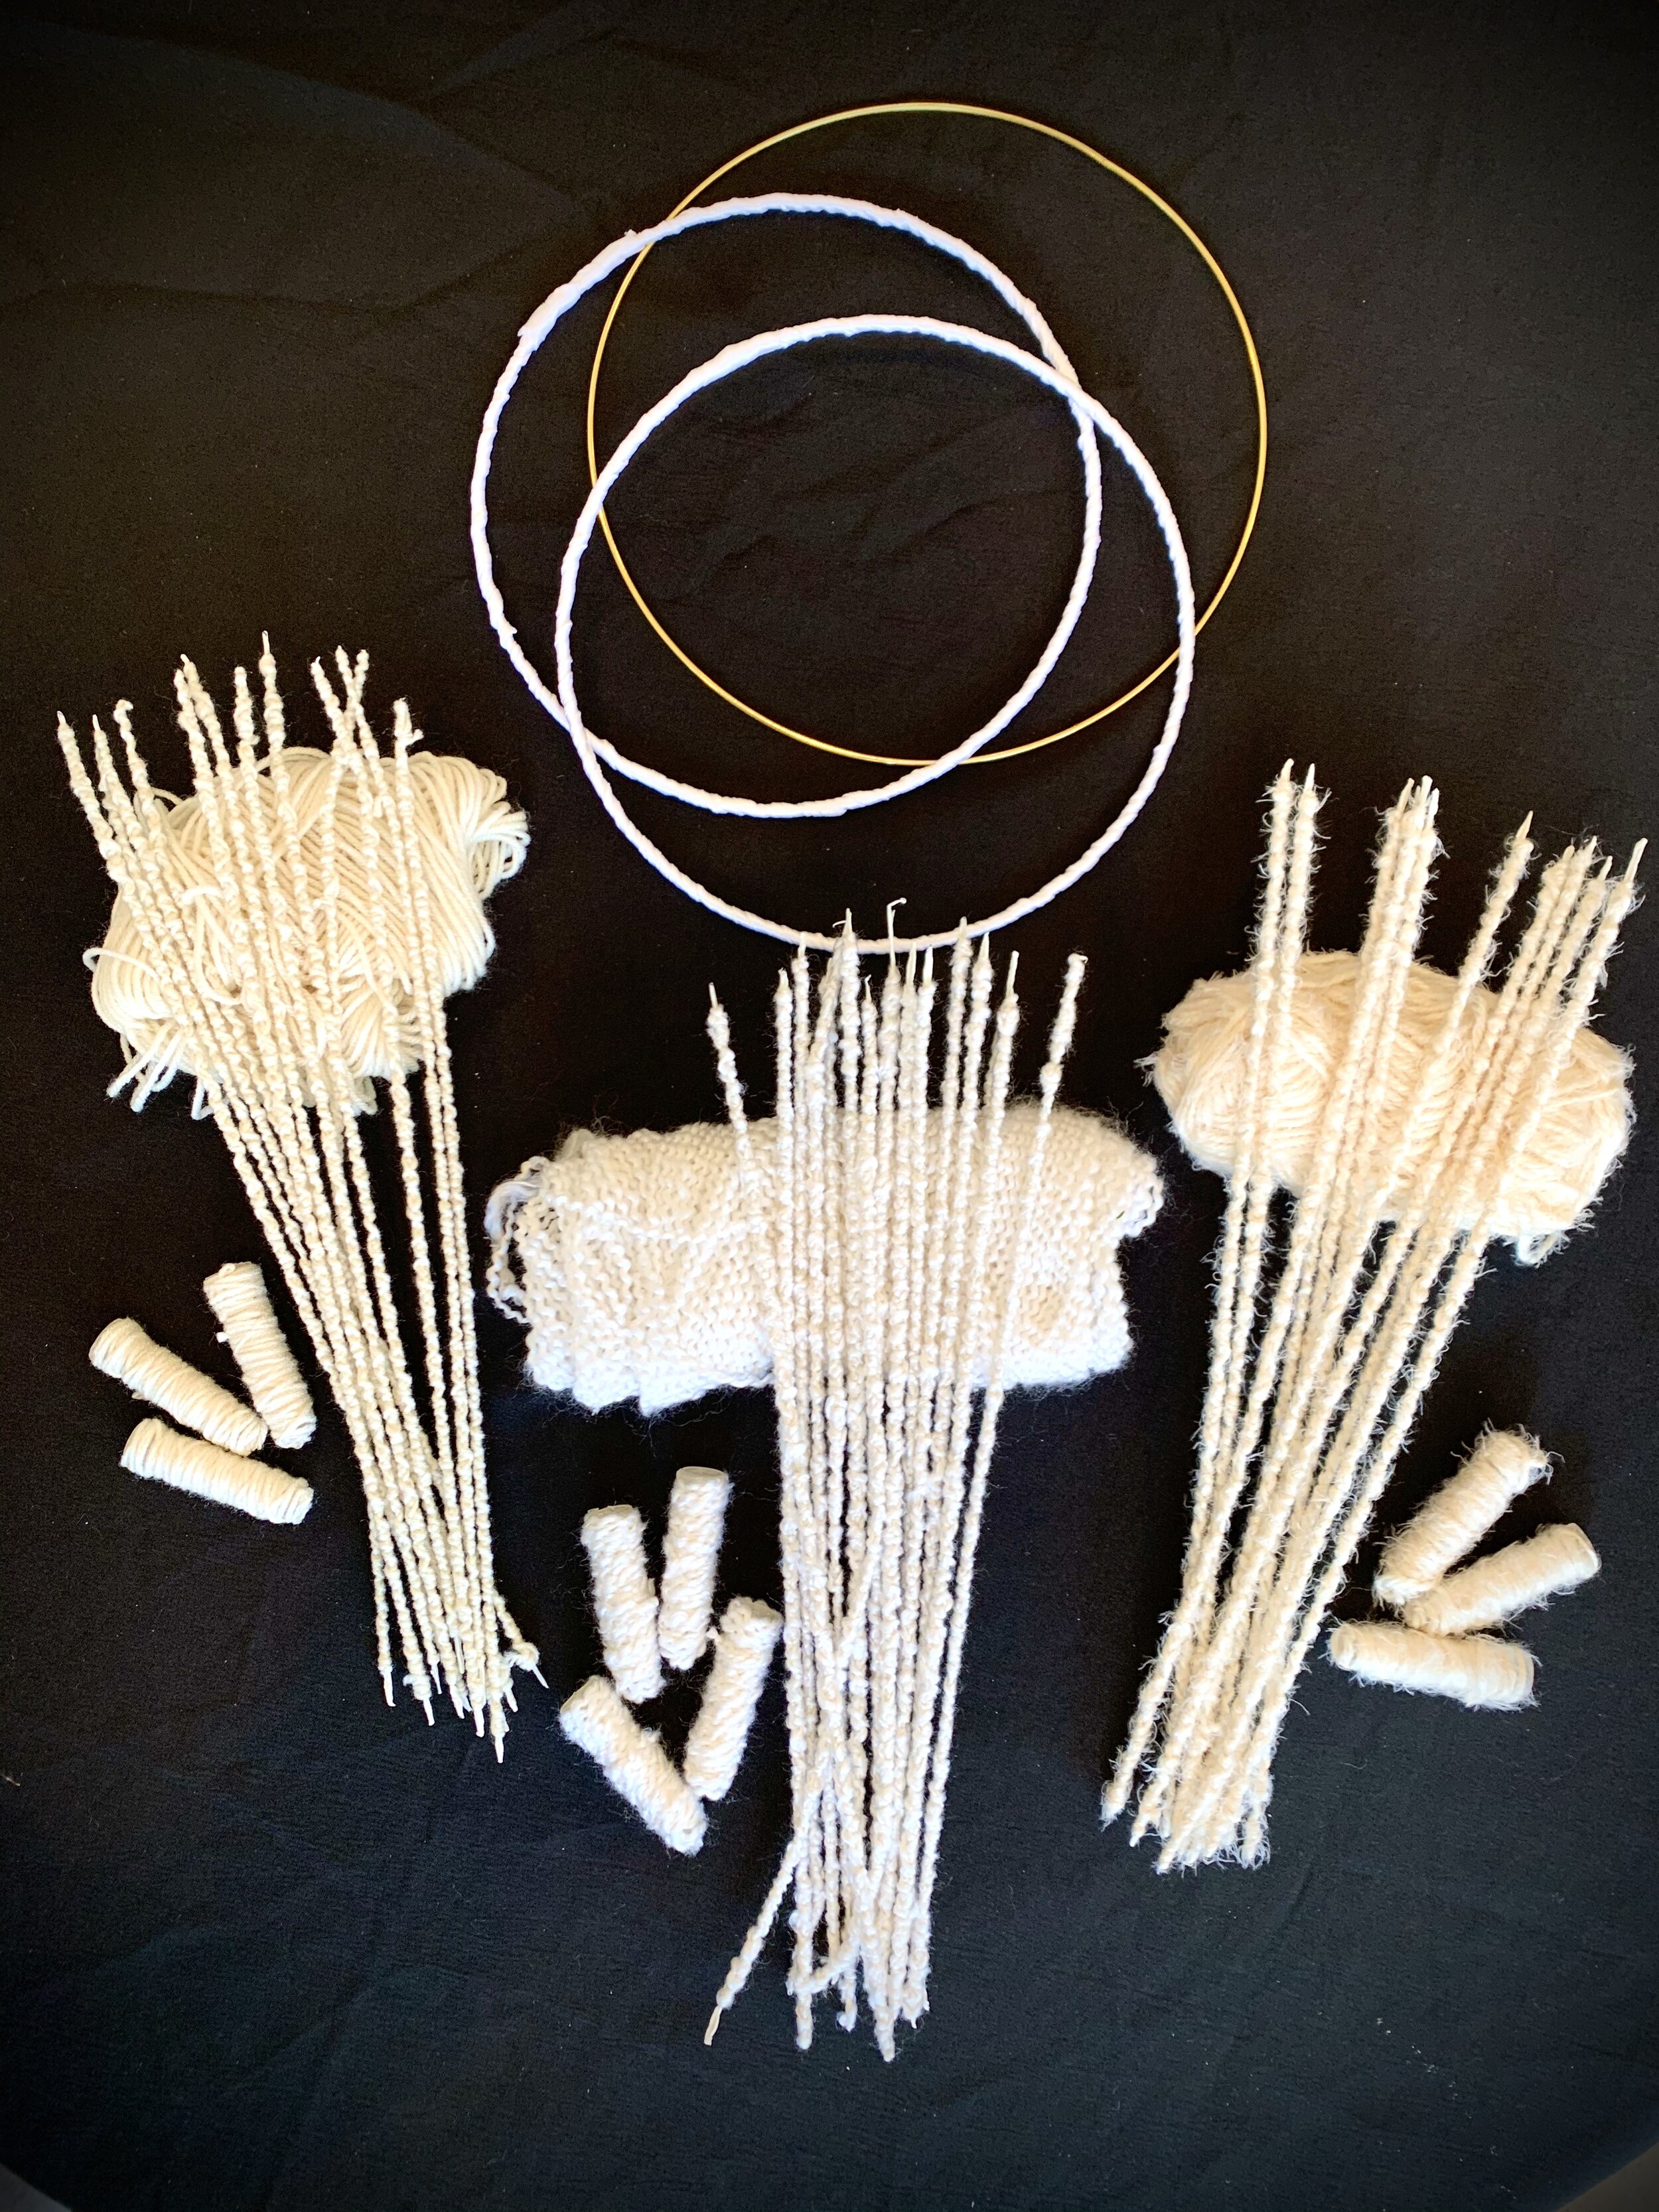
Inspiration: Jaime and I were shopping and saw the most beautiful woman with stunning dreadlocks. I wanted to design a bouquet inspired by that strong and stunning woman. This bouquet was created utilizing different yarn textures secured to an orb containing lilies, roses, carnations, and color enhanced white plumosa. The bouquet trailed as she walked onto stage.

Inspiration: Movement was inspiration for this bouquet. The cymbidium florets and dried materials tend to have a static appearance. The lily grass is what provided the visual movement through the bouquet.

Inspiration: the never-ending circle of love. Love can be continuous and strong. The bouquet form was a Styrofoam circle wrapped with Oasis ribbon and bullion wire. The cascade bouquet contained garden roses, roses, stock, gyp, hanging amaranthus and aussie grasses.

Inspiration: Joining of two souls. The two rings represent the two souls coming together to unite as one. The bouquet was created utilizing two gold rings with florets of roses, dendrobium orchids, and salal as accents. The lace ribbon was utilized to soften the design.

Inspiration: Joining of a family. Today we have many marriages that may have a child on one or either side of the union. This design shows the unity not only of the two being wed but also included the existing children. This bouquet was designed utilizing four gold rings with florets of garden roses, cymbidium orchids, spray roses, hypericum, cushion pomps and salal.


Inspiration: Boho chic was the inspiration for this adornment. We utilized a macramé wall hanging as a base for this design. We secured it to a collar that would be worn down the back of a bride as she walks through a field of wildflowers. The floral was glued on with Oasis floral adhesive consisting of asters, pomps, spray roses and gerbera petals down the strings.

Inspiration: I found a candle holder while out shopping one day. There were two bells hanging from the bottom and I loved the idea of a bride walking down and her bouquet quietly chiming as she walked. The floral consisted of roses, craspedia, lisianthus, asters and eucalyptus.

Inspiration: The fabulous door knocker I discovered in a clearance section. We suspended an Oasis iglue from the bottom of the knocker to hold a bouquet of roses, lilies, delphinium, with a salal designed lotus on top and Oasis bullion wire hanging from below with floret adornment.
Hint: always look in the clearance section and let your mind wonder what it all could become.

Inspiration: The strength and line of chopsticks inspired this bouquet. I tied and glued chopsticks (color enhanced gold) to create the armature for this bouquet. Callas and lily grass were utilized in this bouquet because of the dramatic lines they enhanced.
Inspiration can come from every aspect of life. All you have to do is be open to the possibilities. Take the time to design something new.
A great show has many moving parts and I thank all of those mentioned below for your contributions:

Making A Statement At The International Floriculture Expo
How do you make a statement when the room is full of floral? How do you catch the eye of the person walking by when there is so much to see? This post will show you how I created two statement floral displays during a floral tradeshow. Utilizing amazing product is key to success!
I was thrilled to design the statement arrangements for The Elite Bouquet both during the International Floriculture Expo convention. I know Elite always has amazing product to work with and the team is fabulous, so it was going to be a great experience. I was asked to design two very different moon gates to reflect the themes of the both.

Let’s start at the very beginning…
The first design was to showcase their red rose varieties. I started with the base of the moon gate and added red birch branches and seeded euc dyed red to create the armature. I then attached Oasis cylinder garland to the frame to provide a water source for the roses.

Roses are red…
Next, I inserted 450 red roses to the design. I framed the design with palm fan foliage, aspidistra foliage tied into knots, and red Oasis flat wire for shine.
It certainly did stand out!

Moon Gate #2
The second moon gate I designed was a reflection on an ice cream shop. I started by attaching smilax around the moon gate.

Orange, yellow, hot pink, and cream
I then added the Oasis cylinder garland onto the frame to provide the water source for the floral. Next, I inserted the 600 roses (orange, yellow, hot pink, pink, and cream) into the garland.

Add orbs and ribbons
I suspended Accent Decor orbs with #3 double satin ribbon (orange and yellow) and #9 satin ribbon (hot pink) from the structure. The orbs were filled with assorted color roses and sprinkles.

Et voila!
The finished design was certainly a statement piece!
Take pride in what you do and push yourself to be more than you were yesterday!

Knowing Where It All Starts: Knud Nielsen Design Summit
Invited on a trip to see behind the scenes of a leading floral company is the chance of a lifetime. Understanding the story of Knud Nielsen was a highlight of my career and being able to work with their product was the cherry on top. Join me on an epic journey to Evergreen Alabama to witness the process of how a family has secured their place in floral history.

When Jacob McCall AIFD (Knud Nielsen Co-designer) calls and invites you to be part of the first ever design summit at the Knud Nielsen Co. facilities the answer is always YES! I had absolutely no hesitation to be part of something that was bound to be amazing.
The design summit (pictured) consisted of myself, Andy Hooper AIFD, Jacob McCall AIFD (Knud Nielsen Co-designer), Deborah De La Flor AIFD, and Corey Harbour AIFD.
When we all arrived in Evergreen Alabama we were greeted with the epitome of southern hospitality. The hosts could not have been more gracious. We truly felt like we were part of the family the entire time we were there.
After a lovely lunch and introductions, we were led on a tour of the facilities. I was amazed at how large of an operation it is and how many products they have that I never realized. There is so much history that is part of every item we utilize from Knud Nielsen Co.


The product was endless and my design mind kept racing with ideas. This was going to be a fun adventure!


Design Time!
The stories shared with us about the company were inspiring. This family owned company has been around for decades and still continue to be the leader of dried floral product. Absolutely amazing!
After a day of touring the facilities and learning all about their product is was time to design! They brought us to a room with all of their fabulous product displayed. The instructions were to design and so we did.


The amount of knowledge and experiences I gained from this design summit is incredible. It truly showed me that we all need to learn more about the companies in our industry. Take a moment to understand where our items come from and how history has evolved with them. You will be amazed!
Thank you to the Knud Nielsen family and Jacob for inviting me on this amazing journey!

ChicagoStyle Weddings Designer Challenge
To photoshoot or not to photoshoot—that is the question for today. This post will show you the outcome of industry leaders coming together to create one amazing editorial shoot. This is the time to design for you and your team. Show what lies within yourself.
A local bridal magazine, ChicagoStyle Weddings, invites a team of wedding professionals to create to photo spread for the magazine. Then the voting will begin to select crowd favorite. Our challenge was to be a bit different than the others. Our setting was not a ballroom… it was a moving glass boat down the Chicago River! This was going to be challenging but oh so fun. YES, let’s do this!
We all worked together to create the look we were going for. It was going to be a play on elegant tropics called “Modern Tropics.” The color palette we selected was to be mixed metallics, white, ivory, shades of peach and toffee.
Floral tablescape design
The first item we completed was the tablescape. The palm fronds and aspidistra were color enhanced with rose gold. The pampas grass gave the centerpiece drama and softness all at the same time. We displayed the floral on top of an Accent Décor Biltmore stand to provide height without blocking the fabulous view of Chicago as we sailed down the river. The floral consisted of orchids, pincushion protea and roses.

How to design floral for a photo shoot
When designing a photo shoot remember every angle counts. Make those little moments pop by grouping items together. We chose to group mixed metallic votive holders along the table. Some held candle and others held florets to base the design.


All hands on deck
The deck of the ship was to have two functions for the shoot. One function would be the ceremony and the other function would be the cake display. We designed a moon gate that would consist of coordinating floral from the centerpiece. The Quintessential Cake designed the most beautiful cake we adorned with fresh floral and Coqui Paperie created stunning signage that was hung from our moon gate. Overall, the look was breathtaking.
Behind the scenes note: we could only have the gate up when not moving as it obstructed the view for the captain. So, it was moved many times during our shoot up the river and held up perfectly.


Bridal bouquet design
The bridal bouquet consisted of orchid florets, pincushion protea, roses and color enhanced foliage with a pampas grass collar.

Always bring extra floral!
Always bring extra floral to a photo shoot to enhance other items. Nothing is a better to accent than floral.

Remember when you agree to take part in a photo shoot design something different and unique. Take this moment to be creative and create something beautiful with your team.
Design for the love of design!

Thanks to the incredible companies that made this photo shoot possible:

Flowers Make A Difference: A Runway Show For Survivors
There will never be a moment in my floral career that will come close to this journey. Being able to provide comfort, strength, and beauty to those who have had it all taken from them is something that I will always treasure. This journey allowed me to give back to individuals who have had it all taken from them. Floral design has the power to change a person’s life.
This stage show will always be one of the best floral experiences of my life. South Dakota Florists Association invited me to present a runway show for their convention. I was told this show was not only for florists, but it was open to the public. This is a rare occurrence and I was excited to see the outcome.
I always ask what the client is looking for in a show and was told they trusted me to present an amazing show. I thought about it and a lightbulb went off… make a difference with floral!
The show would consist of three segments with the finale being a segment honoring rape survivors. I wanted to honor those who have had so much taken from them. It was important to show the strength and beauty of those who survived being raped. Not only did we want to honor them, but we always wanted to empower them. We inquired if any rape survivors would want to walk the runway and were grateful with the answers of yes along with other models who wanted to be there in support. It was time for the woman to take back the power!
But I digress. Let’s start from the beginning. The show was to take place at the Arrowwood Resort & Conference Center at Cedar Shore in Oacoma, SD. I arrived in Sioux Falls and my dear friend Patience picked me up from the airport. I was so excited yet nervous about the show. There was a lot of pressure to not only make the audience and association proud, but also the survivors needed to be empowered.

The stage is set and now time to rehearse. Rehearsals went well and I started to see the vision come to life This was a bit overwhelming as the emotions tried to take over. I held them back as the show was not about me… it was about the beauty of floral and survivors.
The time has come for the show to start. I look out into the audience and there is standing room only. We expected the seats full, but we did not expect the crowd that came.
The first segment was inspired by my home state, focusing on the red rose and having fun with burlesque. The night was to start on a high note with music thumping and our show beginning. There were feathers, wrist cuffs, collars, bouquets, pomander balls, boas and a staff to get the show started. The floral used were in jewel tones with heavy red rose influence, gloriosa lilies, calla lilies, carnations, and assorted foliage.


The next segment was inspired by the man I love and will spend the rest of my life with—my husband Jaime. Our wedding was on a beach and I wanted to bring the soft romance to SDFA. This segment was to be soft and romantic as I wanted to bring the mood of the room to settle for this segment. The floral carried were bouquets, armatures with lights, shawls made out of Oasis wire, garland wrap, Oasis muslin ribbon bouquet. The floral was in soft shades of pink, white, ivory consisting of orchids, roses, lilies, garden roses, tulips, with accents of ivy, plumosa, springri and eucalyptus.
Now the evening comes to what we have been waiting for. The finale segment was inspired by stunning, brilliant, strong and beautiful woman who inspire me and we used this inspiration to design a show of empowerment, strength, and beauty of rape survivors. We created superhero gear using a glue gun technique taught to me by the fabulous Helen Miller AIFD. The items designed were bracelets, shields, capes, and armor. The colors were silver, rose gold, gold with jewel tone floral. The floral consisted of callas, asters, mokara orchids, statice, and colorful reindeer moss.
The music starts slow as the first two ladies walk out with lotus bouquets that open to show the beauty inside.
Then the music becomes an empowering and strong rendition of “This Is Me” and the celebration of survivors begins.


We were grateful to share this experience with some rape survivors who were part of the show. I was also addressed after the show by woman in the audience telling us their stories of survival and how the show gave them back power. It was such an honor to express all of these emotions through the art of floral.
It was a show that I will never forget! I thank SDFA for their support and encouragement to put this show together.
Use your passion to change someone’s life!


Thank you to our amazing team that made this show possible:
Make Up & DJ Services
Caid AtAngels
Color & Candlelight Are Magic
Saying I Do in a foreign land. Working out of my studio in Chicago is one thing but working in a hacienda in Leon, Mexico is completely another adventure. What does it take to complete a wedding design in an unfamiliar location? How will it all come together? Will the end result be everything the bride expected? Read on to learn more about the answers to the above questions.
Leon, Mexico is my next stop on my floral journey. I am to design a wedding to take place at Templo Expiatorio Diocesano del Sagrado Corazón de Jesús. The marriage celebration was to take part at Hacienda Los Rincones. Two amazing and picturesque locations. I could not wait to get started. The bride specified color and romance were important to her. It was going to be fabulous to be a part of this wedding.
We land in Leon after two flights, thunderstorms, broken luggage and a desire to design an amazing wedding. Jaime and I brought many of the hard goods needed from Chicago with us. We placed orders for the floral/foliage at a local supplier in Mexico ahead of time. One thing I can tell you when designing destination weddings is: as prepared as you are you MUST be able to shift items quickly. Most of the items were as expected and some were not. The show must go on!
Our design location was in a guest room at the venue. We stored all the completed items in the room while we designed outside with an amazing view. Something to be aware of is that August in Mexico is HOT. Ensure all your floral has adequate water sources as well as yourself.


Candlescapes were important to enhance the evening. Nothing beats the glow of candles. I utilized some of the large gold pedestals to hold floral arrangements while the rest were adorned with pillar candles. The smaller gold candle holders were utilized as accents for the tablescape.


An Oasis European holder was used to design the bridal bouquet. I enhanced the back of the holder with a satin ribbon and pearl pin treatment. The boutonniere was a garden rose with satin ribbon wrap and Oasis bullion wire accent.


Time has come to set up the colorful and glowing reception! We used bright color fresh floral such as hydrangea, roses, garden roses, orchids, and alstroemeria. The foliages utilized for the wedding were seeded eucalyptus, plumosa, and salal. We accented with permanent botanical orchids, sheer ribbon and candles.
Tall centerpieces were designed for some of the tables. I placed the floral on candle stands the venue had on site.


Groupings of candles and pedestal floral were displayed on other tables.


The estate tables held long floral chandeliers designed upon a wood board. The board was placed upon glass vases the venue had on site. We then hung candles form the board to achieve the chandelier design aspect we were looking for.


The newlyweds sat at an ornate table we adorned with cascading floral and candlelight.

The bride carried a colorful bouquet consisting of orchids, roses, garden roses, hydrangea and assorted foliages as she walked towards her forever love.
Life takes us all on a different journey, but the final stop should always be love!

From Chicago To Puerto Vallarta With Love
Planning a wedding for clients is a passion of mine that I take extremely seriously. I had thought that the years of working on other couples’ weddings would make the planning of my own wedding easier. Although it did prepare me for organization and design, it did not prepare me for the obstacles that lie ahead. Oh, and we also decided to go to a different country to do it all. Read on for the highs and lows of planning your big day.
Some say planning your own wedding is a magical thing…. I will say yes, it is magical, but there are sure hurdles to jump to get to the “I Do.” Jaime (my husband) and I knew we wanted to be married in Puerto Vallarta, Mexico. We did not realize just how hard it would be to find a venue. We went with family and friends on a scouting trip that took us to 20 venues until we found the perfect site for our wedding. Our wedding was to be held at the Hard Rock Hotel in Puerto Vallarta, Mexico. Now it is time to start the planning!


How scout a venue for your wedding
When you go on a scouting trip have a list of criteria in hand and appointments made at various venues. Below is an example of our list:
Beach location for our first ceremony and welcome reception (we had two different ceremonies)
A covered location for our formal ceremony that would be private
A reception room that can be transformed into our formal reception
A room to design our wedding floral in once we arrive
Accommodations to fit our guests needs
Availability to hold 3 days of events on location
A team on location that can be utilized to help plan the events
Sourcing bilingual wedding invitations
Now the location was set and it was time to work on the details in Chicago. Our invitations were to be done in English and Spanish as our wedding was to unite the USA family and friends with the Mexico family and friends. We made sure every detail was completed to make everyone feel welcome. The amazing paper goods were designed by Charmant Invitations. We hired Rose Photos to travel with us from Chicago to Mexico to capture our events in photos. Having the best companies will also result in amazing outcomes.


Sourcing wedding flowers in Mexico
Once Jaime and I arrived in Mexico, we realized the floral product we had shipped did not make it through customs. Our once plan of cascading orchids and other floral was to be altered in a moment to plan B. We had all of the hard goods packed in our luggage so at least that was safe. Now the hunt began to find flowers and foliage for our wedding. We discovered a local wholesale house and purchased what they had in stock and completed our items at Costco.


A friend in need…
Never underestimate the power of friendship. Being a floral artist, I have many fellow floral artists as friends. One of my best friends, Frankie Peltier, AIFD and his husband Shaun arrived early to Mexico to help us prepare for the wedding. It was amazing to have Frankie help me design as Shaun and Jaime went on errands. Memories to last a lifetime!


Flowers for our big day
As the guests arrived the resort was filled with love and floral. As the formal wedding day arrived it was time to set-up the reception. Drapes were hung on the walls, lighting was ready, and our floral was complete. We used Oasis wire to create the designs. It was important to mix the hard and soft to complete the ambience. Frankie payed homage to the venue by creating music sheets out of design wire.


How to dress a wedding party
Our groom’s ladies were dressed in white and held bouquets of white floral with Oasis decorative wire armatures and pearl accents. Our flower girls wore white and carried pomander balls of orchids with gray pearls. My daughter and Jaime’s mother were to walk us down the aisle/marry us were dressed in black and white carrying a white cascade bouquet of phalaenopsis orchids, roses, tulips and Oasis decorative wire armatures and pearl accents. The groomsman wore black with a rose boutonniere. Jaime and I wore shades of gray with white orchid boutonnieres.


Our wedding day was magical and something we will always remember. It is not the troubles that should be remembered but the love and friendships will always fill our hearts.